

Recently, while writing articles on model kit building, I’ve frequently brought up hobby-specific terms.
Because my day job happens to involve plastic product design, I decided to write this piece explaining why defects occur in model parts and highlighting the differences between modeler slang and professional engineering terminology.
This article focuses primarily on injection-molded kit parts, analyzing common defects, their root causes, and related design principles:
Dents and Surface Unevenness on Parts
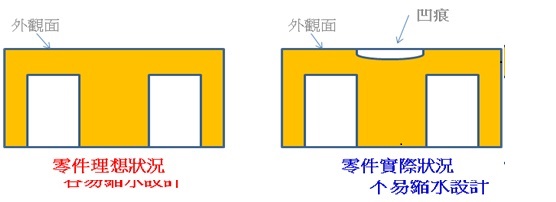
- Hobbyist Term: Sink mark (縮模).
- Industry Term: Sink mark / Shrinkage (縮水).
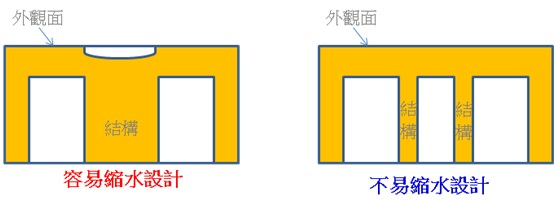
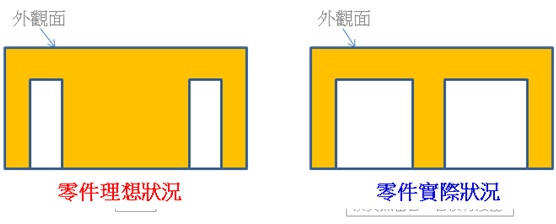
- Cause: Excessively thick wall sections in the internal structure. During injection molding, molten plastic must be heated; as it cools, thermal shrinkage occurs. Areas with thicker plastic contract more than thinner walls, pulling the exterior inward and causing sink marks on the opposite surface.
Sharp Edges and Scratchy Seams
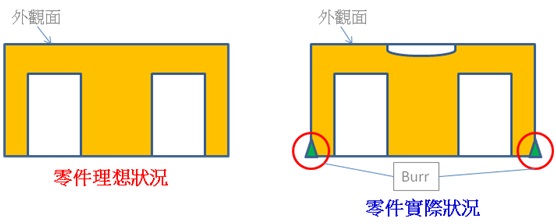
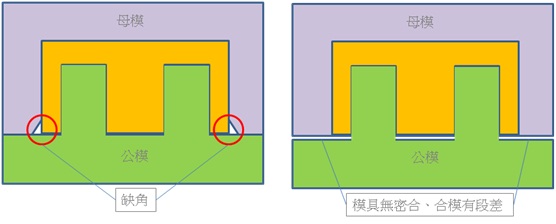
- Hobbyist Term: Step disparity / Mold misalignment (段差 / 模具不平).
- Industry Term: Flash / Burr (毛邊 / 毛刺 / Burr).
- Cause: Chipped mold edges, poor fit or misalignment between the core and cavity halves of the mold (most commonly parting-line mismatch), excessive injection pressure during molding, or worn tooling.
Coring Out / Material Reduction
- Hobbyist Term: Hollowed-out parts / Plastic-saving (偷膠).
- Industry Term: Coring out / Rib-coring / Material reduction (偷肉 / 減膠).
- Why Coring is Done:
- Without coring, the excessive wall thickness would trigger the surface sink marks mentioned above.
- To reduce resin consumption and lower manufacturing costs.
Gates and Sprues / Injection Points
- Hobbyist Term: Gate / Nub (湯口).
- Industry Term: Gate / Infeed point (料頭 / 進膠點).
- Why Gates are Necessary:
- As the name implies, this is the entry point through which molten resin enters the mold cavity to form the part.
- Gate placement involves a complex engineering discipline encompassing cooling channel layouts, mold flow analysis (MFA), weld line positioning, dimensional accuracy across both ends of the part, and more. I’ll delve deeper into this in a follow-up article.
Common Modeler Questions and Technical Analysis
Why are parts that should be sharp (like Gundam antennae) dull on Company B’s kits? Why not mold them sharper?
- Tooling delicacy and safety: Sharp tips require delicate mold machining. Extremely small end mills for CNC milling break easily. High-precision features often require manual benchwork or EDM, which introduces manufacturing variance and higher failure rates.
- Injection flow: For molten plastic to fill an ultra-sharp cavity tip reliably, injection pressure must be significantly increased, which easily causes flash.
- Mold wear: Delicate tooling breaks down quickly under high-volume production cycles.
Why are some gates placed in prominent, visible spots rather than hidden underneath?
Gate placement involves many competing constraints: it dictates weld line locations, overall dimensional stability, part filling integrity (preventing short shots), and cooling efficiency. Often, placing the gate on an under-surface makes filling impossible, leaving no alternative but to place it on an exterior surface.
Why isn’t color separation better? Masking during painting is such a headache.
- Part breakdown constraints: Better color separation requires splitting single components into multiple parts, each needing its own snap-fit or alignment structure, which the limited interior space may not accommodate.
- Cost reduction: Consolidating pieces cuts tooling and assembly costs.
- Purging costs: Every resin color change requires purging the injection barrel and hot runners, wasting valuable production time and material.
Why are limited-edition kits so shockingly expensive?
- A set of injection molds costs anywhere from tens of thousands to millions of dollars. Recovering tooling costs over a small production run means the per-unit cost must be significantly higher.
- Limited editions often involve special coatings, platings, or delicate tooling details that do not suit high-speed mass manufacturing. Molds may need frequent teardown and bench refurbishing after every few shots, rapidly degrading tool life.
- Many limited runs require manual secondary operations, and skilled labor is costly.
- And honestly, limited editions are simply very profitable… (runs away).
Support Independent Perspectives & In-Depth Insights
Every thoughtful analysis and candid critique comes from our dedication to truth and quality. We choose not to follow sensational algorithms or clickbait headlines.
Sustaining independent research requires reader support. Make a one-time or monthly contribution, securely processed by Google.
Payments secured by Google · Manage or cancel anytime in your Google Account




Comments