
The AirPort Time Capsule is an iconic piece of hardware from Apple Inc., seamlessly combining a blazing-fast 802.11ac wireless router with network-attached storage (NAS) backup drive functionality.
The greatest advantage of using this wireless hard drive is that Apple’s entire lineup (MacBook, iMac, iPhone, iPad) can access files effortlessly through a simple setup process, enabling Macs to perform fully automated, hassle-free wireless backups via “Time Machine”.
This article details the hardware interface specifications of the AirPort Time Capsule (marketed in Japan as the AirMac Time Capsule), the first-time setup workflow, and practical tips for Time Machine backup operations.
Exterior Design and Rear Port Breakdown
Upon unboxing the AirPort Time Capsule, its clean, upright white tower design appears virtually identical to Apple’s contemporary AirPort Extreme base station. The device’s primary connectivity resides on the rear panel, featuring six ports arranged vertically from top to bottom:
- Ethernet LAN Ports (3 ports): Dedicated 10/100/1000BASE-T Gigabit Ethernet connections for desktop computers, switches, or NAS devices.
- USB 2.0 Port (1 port): For connecting an external USB hard drive for expanded storage or sharing a USB printer across the local network (cannot connect directly to a computer via USB cable).
- Ethernet WAN Port (1 port): For connecting to a Chunghwa Telecom modem, cable modem, or upstream gateway router.
- AC Power Receptacle: Internal power supply built directly into the chassis, eliminating the need for an external power brick.
First-Time Setup: Using AirPort Utility
When plugged in for the first time, the subtle status indicator light nestled on the lower front panel communicates operational states:
- Initial State: Upon receiving power, the light briefly flashes green, then transitions to solid amber while the internal mechanical drive spins up.
- Standby State: After a few moments when the hard drive stabilizes, the indicator begins flashing amber, signaling that it is waiting for initial network configuration.
Step 1: Launch AirPort Utility
On your Mac, open Launchpad, find and run AirPort Utility (you can also download the companion AirPort Utility app on an iPhone or iPad).
Step 2: Discover and Configure the Network
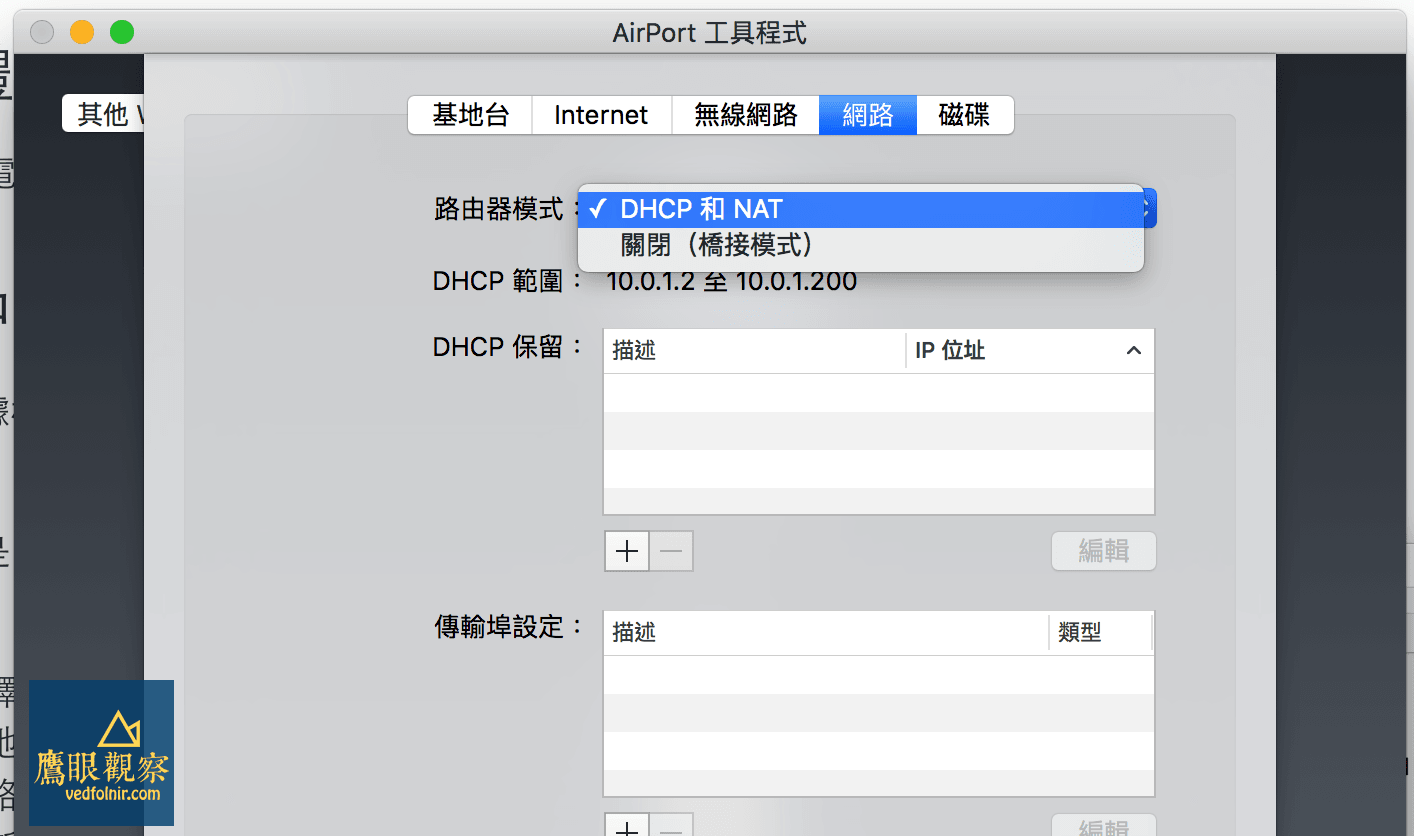
- In AirPort Utility, click “Other Wi-Fi Devices” or look for the newly detected AirPort Time Capsule.
- Follow the on-screen prompts to assign a name to the base station (such as “My Time Capsule”) and set up a secure Wi-Fi network name and password.
Step 3: Complete Setup and Verify Status
Once configured, the Time Capsule will reboot. When the front indicator light turns solid green, both the high-speed wireless network and the internal backup drive are configured and operating normally!
Configuring Automated Wireless Backups with Time Machine
After the wireless base station is active, configuring automated backups on your Mac takes just a few clicks:
- Open System Preferences on your Mac and select Time Machine.
- Click Select Backup Disk…; the internal drive of your freshly configured AirPort Time Capsule will appear in the list.
- Check the box for Back Up Automatically. The system will start an initial full backup in the background. Going forward, whenever your Mac connects to this Wi-Fi network, Time Machine will automatically perform hourly incremental backups!
AirPort Time Capsule Hardware Specifications
| Specification | Details & Technical Parameters |
|---|---|
| Dimensions & Weight | Height: 168 mm, Width: 98 mm, Depth: 98 mm; Weight: approx. 1.48 kg |
| Wireless Protocols | IEEE 802.11a/b/g/n/ac (Simultaneous dual-band 2.4 GHz and 5 GHz) |
| Antenna Architecture | 6-element beamforming antenna array |
| User Capacity | Supports up to 50 concurrent connected users |
| Internal Storage | 2 TB or 3 TB server-grade 3.5-inch hard drive |
Behind the Tech: Hardware Differences Between AirPort Extreme and Time Capsule
In Apple’s official retail specs, the contemporary AirPort Extreme and the AirPort Time Capsule (2TB) showed a weight difference of roughly 535 grams.
That extra pound of heft comes entirely from the internal 3.5-inch SATA hard drive and its associated thermal mounting brackets and cabling. Although both devices share an identical vertical tower enclosure and primary logic board architecture, the Extreme model lacks the internal SATA data and power ribbon headers, preventing DIY users from simply dropping an aftermarket drive inside to upgrade it.
Support Independent Perspectives & In-Depth Insights
Every thoughtful analysis and candid critique comes from our dedication to truth and quality. We choose not to follow sensational algorithms or clickbait headlines.
Sustaining independent research requires reader support. Make a one-time or monthly contribution, securely processed by Google.
Payments secured by Google · Manage or cancel anytime in your Google Account


Comments