
Android is an open-source software platform and mobile operating system built upon the Linux kernel. Formally announced by Google Inc. on November 5, 2007, Google spearheaded its rollout by establishing the Open Handset Alliance with dozens of mobile hardware and telecom partners to steer ongoing development and specifications.
Setting Up the Google Android Development Environment
Originating from Google and striving for maximum cross-platform compatibility, Android selected Java as its primary development language, making entry-level development much more accessible than Apple’s iOS ecosystem (at least regarding hardware requirements).
Furthermore, thanks to Java’s inherent cross-platform strengths, Android software can be developed on Windows, macOS, and Linux platforms, adding great flexibility. This guide adopts the Windows operating system as the primary development platform; for installations on other OS environments, refer to Google’s official documentation.
Naturally, writing Android applications begins with acquiring the necessary development toolchain. We can start by navigating to the Google Android Developer site and following the Quick Start instructions. Beyond the core Android SDK (which includes the Android Emulator), we must install two prerequisite packages: the Java JDK and the Eclipse IDE, followed by installing the Android Development Tools (ADT) plugin within Eclipse (providing tools integration, custom XML editors, debug output panes, and more).
Note that beyond installing ADT, you also need to fine-tune its parameters according to the instructions in the Configuring the ADT Plugin guide.
After obtaining these packages, proceed with installation in order: Java JDK, Eclipse, ADT, and the Android SDK. Eclipse runs portably without traditional installation, though you will be prompted to designate a workspace folder upon its initial launch.
Once the initial files are in place, open Eclipse, navigate to Help > Install New Software, enter http://dl-ssl.google.com/android/eclipse into the Work With field, proceed with the update wizard, and select and install the Android Development Tools (ADT) Plugin.
If you encounter an error during the Android SDK setup in the Refresh Sources window such as:
Failed to fetch URL https://dl-ssl.google.com/android/repository/repository.xml, reason: HTTPS SSL error. You might want to force download through HTTP in the settings.
Close that window and the subsequent Choose Packages to Install prompt. In the left navigation pane of the Android SDK and AVD Manager window, change the selection from Installed Packages to Settings, and check the option: “Force https://… sources to be fetched using http://…”. Afterward, return to Installed Packages and execute Update All again.
If packages still fail to download automatically after following these steps, you will need to download the components offline and manually extract them into appropriate directories (e.g., C:\Android). Because specific directory hierarchies change across releases, exact locations are omitted here; if needed, search online or consult ANGGRIAWAN SUGIANTO’s walkthrough. In short, ensure each component is extracted into its proper subfolder inside the main Android SDK directory.
After both the Android SDK and ADT plugin are installed, ADT must be configured. In Eclipse, go to Window > Preferences, select Android from the left pane, click the Browse button next to SDK Location on the right, and specify the folder where your SDK is stored (e.g., C:\Android). Completing these steps finalizes basic Android environment installation and configuration.
Beginner’s Hands-On Walkthrough
Having completed all setup steps, we can now use Eclipse to develop Android apps. After launching Eclipse, follow these steps to generate a sample project:
- Go to File > New > Project…;
- In the New Project dialog, select Android > Android Project;
- The New Android Project dialog will appear;
- For this test run, select Create project from existing source, and click Browse under Location;
- Within the Android SDK directory, navigate to the
samplesfolder, selectApiDemos, and click OK; - Back in the New Android Project dialog, select an appropriate Build Target (for this walkthrough, Android 2.2);
- Click Finish.
Due to version disparities, error markers might crop up at this stage, requiring project troubleshooting:
- In the left pane of Eclipse (Navigator or Package Explorer), if a yellow exclamation mark appears over the newly added project (
ApiDemos), right-click the project name and choose Android Tools > Fix Project Properties to execute repair steps. - If the error states
The type R is already defined, it indicates duplicate definitions ofR.java, usually triggered by conflicts between older and newer SDK revisions. In this scenario, simply deleteR.javaunder thesrcfolder, retaining the generatedR.javaunder thegendirectory. - If red error icons appear on the project name or in the Problems view (such as
Project 'ApiDemos' is missing required source folder: 'gen'andThe project cannot be built until build path errors are resolved), the project cannot compile cleanly. The former indicates issues with thegenfolder; opening any.xmlresource file, making a minor edit, and saving it will trigger regeneration, resolving both errors simultaneously.
Although error indicators (red crosses) are resolved, 332 yellow warning signs may still linger. While selecting Fix Project Properties will not clear all warnings, these do not impair basic testing and can be safely bypassed for now.
Android Virtual Device (AVD Emulator)
When physical Android hardware is temporarily unavailable, Android’s virtual machine allows us to configure and emulate varied hardware profiles directly—acting as an integrated development emulator.
To run a project within the emulator, configure runtime parameters as follows:
- In Eclipse, select Run > Debug Configurations…;
- In the Debug Configurations window, right-click Android Application in the left column;
- Select New from the context menu to generate a new run profile;
- In the right pane, assign an identifiable name in the Name field (e.g.,
ApiDemos); - Next to Project, click Browse to select the corresponding project;
- Confirm that Launch Default Activity is selected under Launch Action;
- Click the Debug button at the bottom right.
However, if this is your very first time running an emulator after configuring the environment, Eclipse might fail to spawn the virtual device, returning an “Android AVD Error”. To resolve this, configure the virtual device through these steps:
- Click OK on the error dialog to proceed;
- The Android SDK and AVD Manager window will open;
- Select Virtual Devices in the left pane;
- Click the New… button on the right;
- The Create new Android Virtual Device (AVD) dialog will pop up;
- Enter an appropriate name in the Name field (e.g.,
EclipseDevice); - Choose a target platform (e.g.,
Android 2.2 - API Level 8); - Configure optional hardware properties as desired, such as Abstracted LCD Density, Battery Support, SD Card capacity, and screen resolution;
- Click Create AVD to create the new emulator profile.
Once configured, re-run the Debug procedure, or click the Run/Debug icon on the Eclipse toolbar. The emulator window illustrated in Figure 1 will launch, ready for testing.
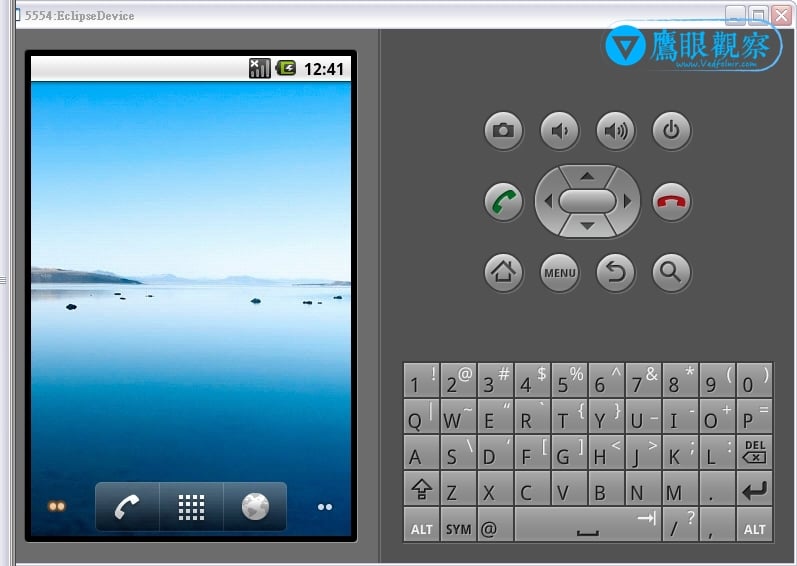 Figure 1: Google Android Virtual Machine Emulator.
Note: The only operational difference between Debug and Run is that Debug logs real-time program execution states. Tips: While the emulator is running, pressing
ALT + Entertoggles full-screen mode;F6enables trackball simulation mode;Deletepauses trackball mode; andCTRL + FN + F12rotates emulator screen orientation.
Hello Vedfolnir
Seeing the heading above might raise eyebrows. Hello Vedfolnir? What does that have to do with Android? If you think of it as “Hello World,” everything clicks. Indeed, Hello Vedfolnir is simply an idiosyncratic, cheeky rendition of Hello World (smiles).
Regardless of naming, the goal of this section is creating our very first native Android application. Follow these development steps:
- Open Eclipse, select File > New > Project…;
- In the dialog, select Android > Android Project, and click Next;
- The New Android Project dialog shown in Figure 2 will appear; fill in the fields (Project Name, Build Target, and Properties) accordingly;
- Click Finish to complete project generation.
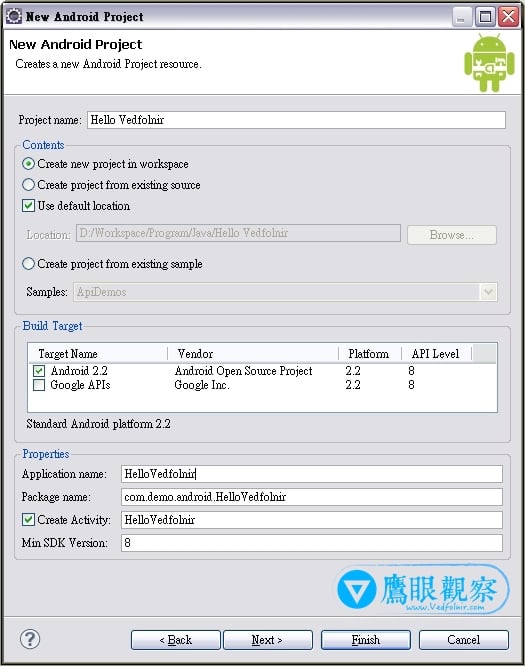 Figure 2: New Android Project Window.
Once complete, your new project will appear in the Eclipse workspace. Clicking Run prompts you to select the run mode; choose Android Application, and the emulator will launch, displaying the Hello Vedfolnir interface. Concurrently, an application icon will appear in the emulator’s app drawer, as shown in Figure 3.
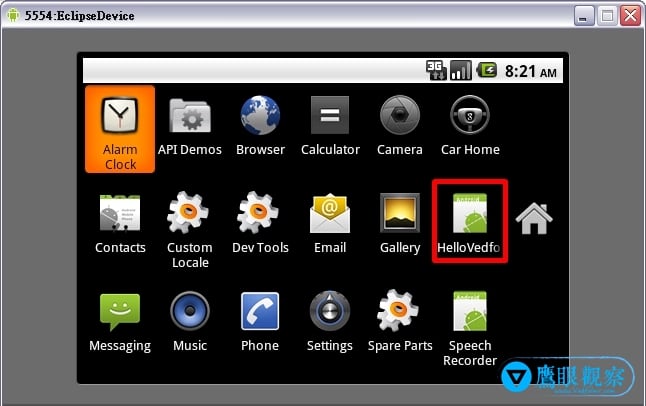 Figure 3: Emulator Application Drawer.
Note: In the New Android Project dialog under Properties, Package name follows a two-part namespace convention to distinguish classes via distinctive package structures and paths. Create Activity designates the primary launch activity class (subclassing the
Activitybase class), conventionally written in CamelCase.
Project Structure Overview
Key components of the standard Android project structure include:
AndroidManifest.xml: Application manifest detailing permissions, features, activities, and services provided by the app.src: Source code directory containing primary Java source files (*.java).gen: Generated directory containingR.java, representing theRclass that acts as a comprehensive resource registry.res: Resource directory storing application assets, with three default folders:layout(XML UI definitions),values(strings, dimensions, and arrays), anddrawable(image assets).
The R Class
The R class in Android serves as an internal lookup catalog. It acts as an intermediary mapping user interfaces, images, and string constants to unique integer resource IDs. R.java is automatically compiled and kept in sync by ADT whenever resources are modified within the res directory, providing programmatic references to external XML definitions.
Starting a New App
(To be continued)
Recommended Appendix:
- Official Android Developer Portal
- Wikipedia: Android (Operating System)
Support Independent Perspectives & In-Depth Insights
Every thoughtful analysis and candid critique comes from our dedication to truth and quality. We choose not to follow sensational algorithms or clickbait headlines.
Sustaining independent research requires reader support. Make a one-time or monthly contribution, securely processed by Google.
Payments secured by Google · Manage or cancel anytime in your Google Account




Comments