
If you want to host multiple sub-websites under a single top-level domain name, WordPress’s built-in Multisite (WPMU) networking feature delivers exactly what you need.
WordPress Multisite enables a primary domain (e.g., vedfolnir.com) to partition countless subsites across either subdomains (such as tech.vedfolnir.com) or subdirectories (vedfolnir.com/tech).
For instance, if a classroom registers the domain 0308.org, the administrator can spawn individual student blogs based on student IDs, such as 0805.0308.org (or 0308.org/0805) and 0806.0308.org (or 0308.org/0806), allowing each student to maintain their own reading journal or personal portfolio.
Step-by-Step Guide to Installing WordPress MU Multisite
Before enabling Multisite, starting with a clean WordPress installation is strongly recommended to avoid preexisting URL rewrite and database conflicts.
Step 1: In your WordPress root directory, open wp-config.php and add the following line immediately above /* That's all, stop editing! Happy blogging. */:
define('WP_ALLOW_MULTISITE', true);Step 2: Save the file and refresh your WordPress admin dashboard. You will see a new entry under Tools > Network Setup. Clicking it brings up the “Create a Network of WordPress Sites” configuration screen (shown below).
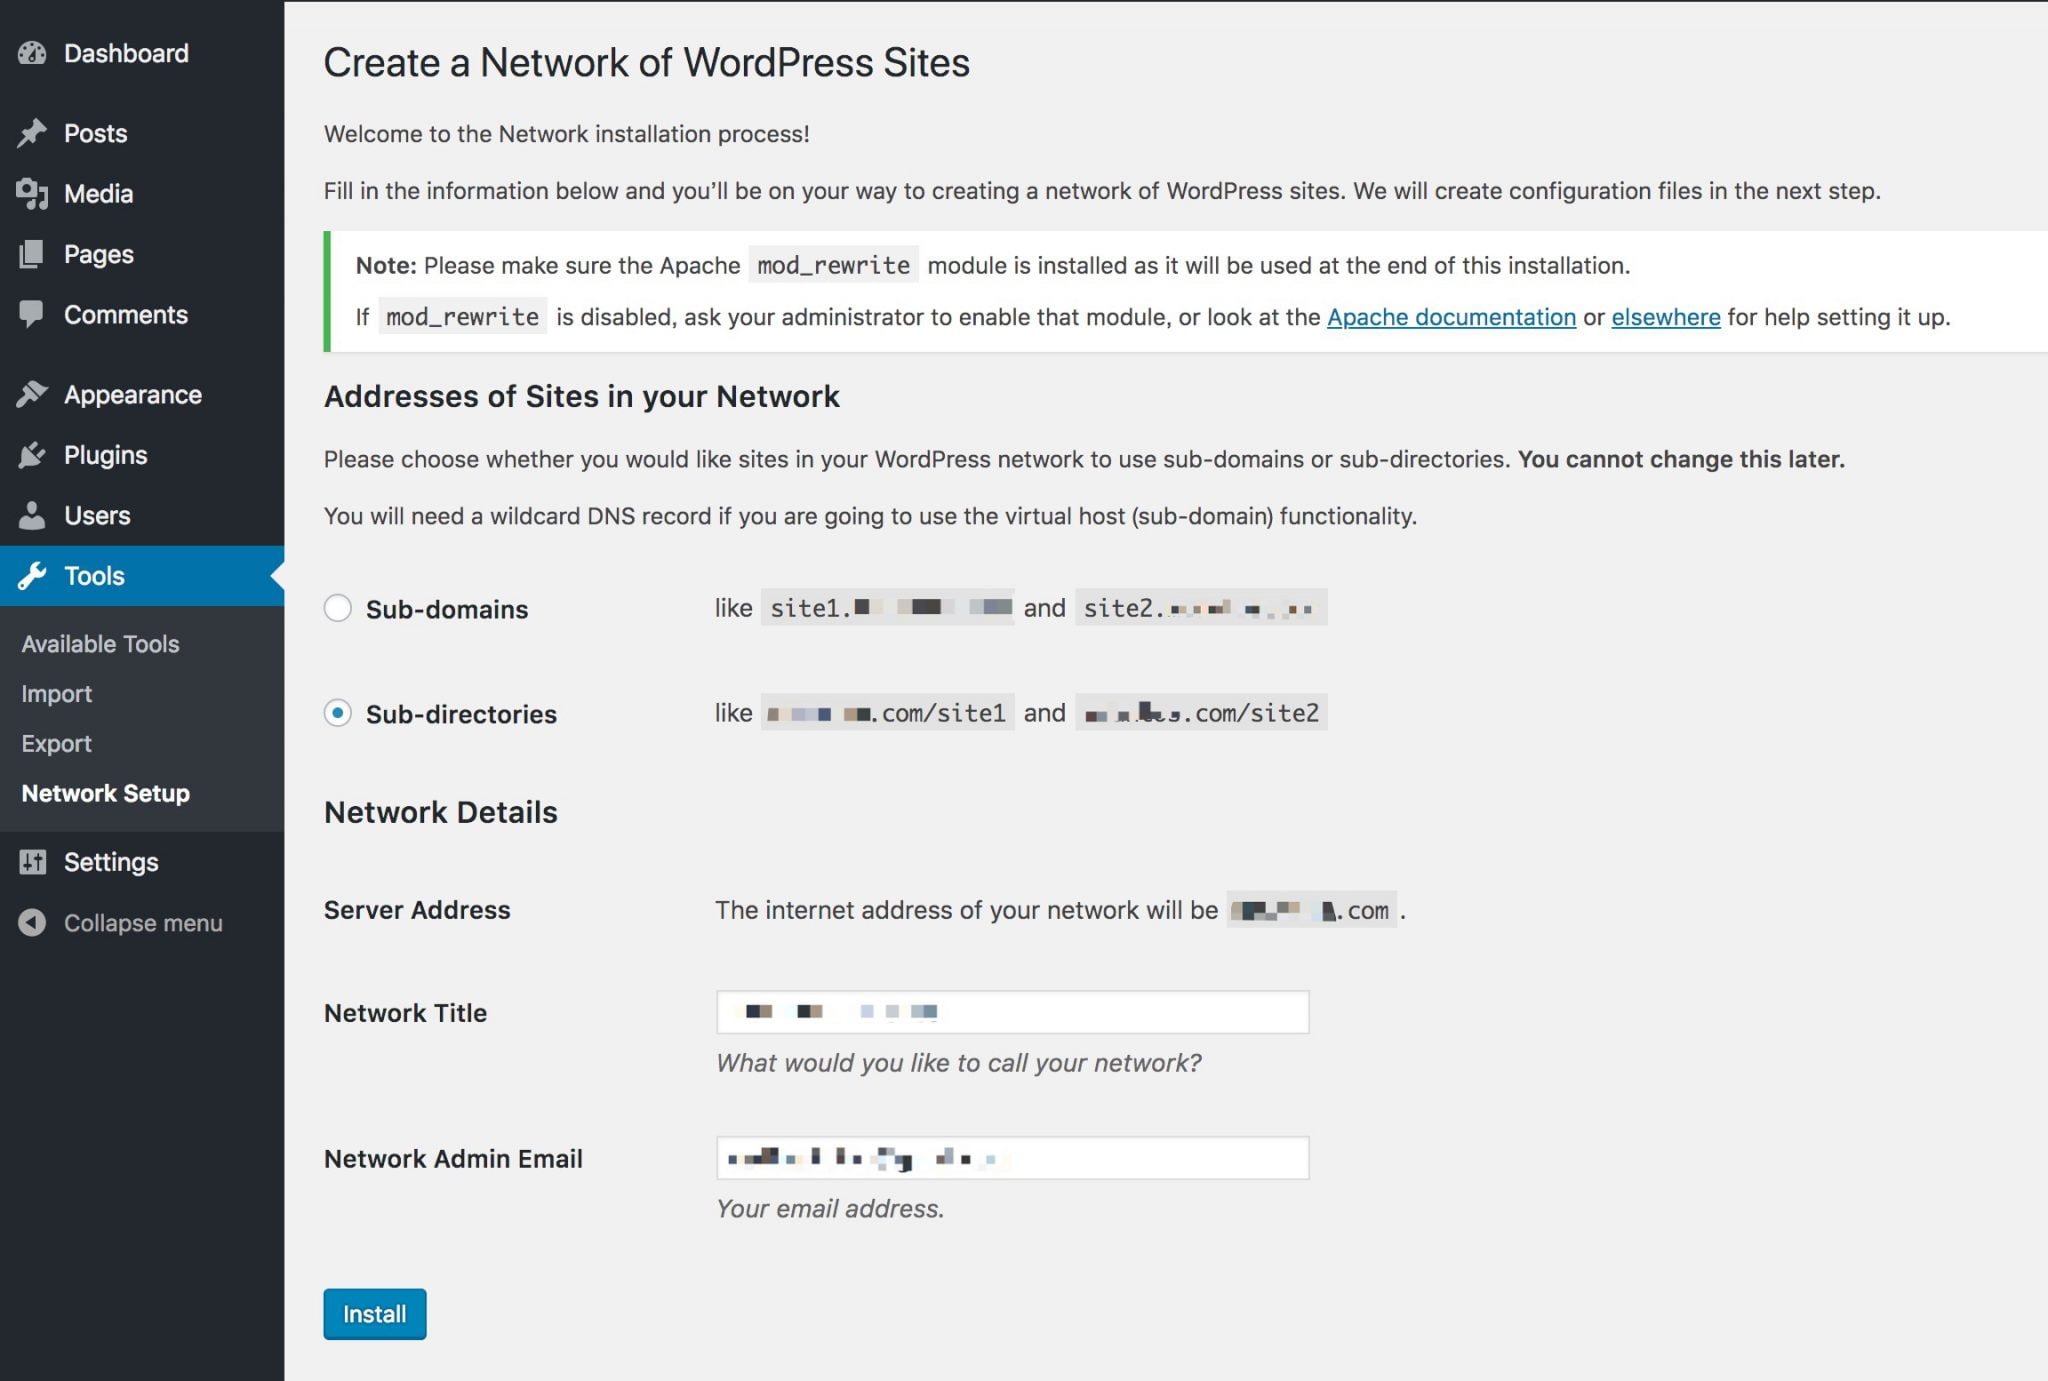 Create a Network of WordPress Sites
Step 3: Choose your subsite network structure: either “sub-domains” or “sub-directories”. Next, fill in the “Network Title” and “Network Admin Email”. These values can be updated later from the Network Settings screen. Once filled, click the “Install” button to generate network rules.
Step 4: WordPress will present two code blocks containing custom configuration directives that must be inserted into wp-config.php and .htaccess respectively.
Note: The generated .htaccess rules completely replace the default WordPress rewrite rules. Make sure to back up your existing .htaccess before saving changes.
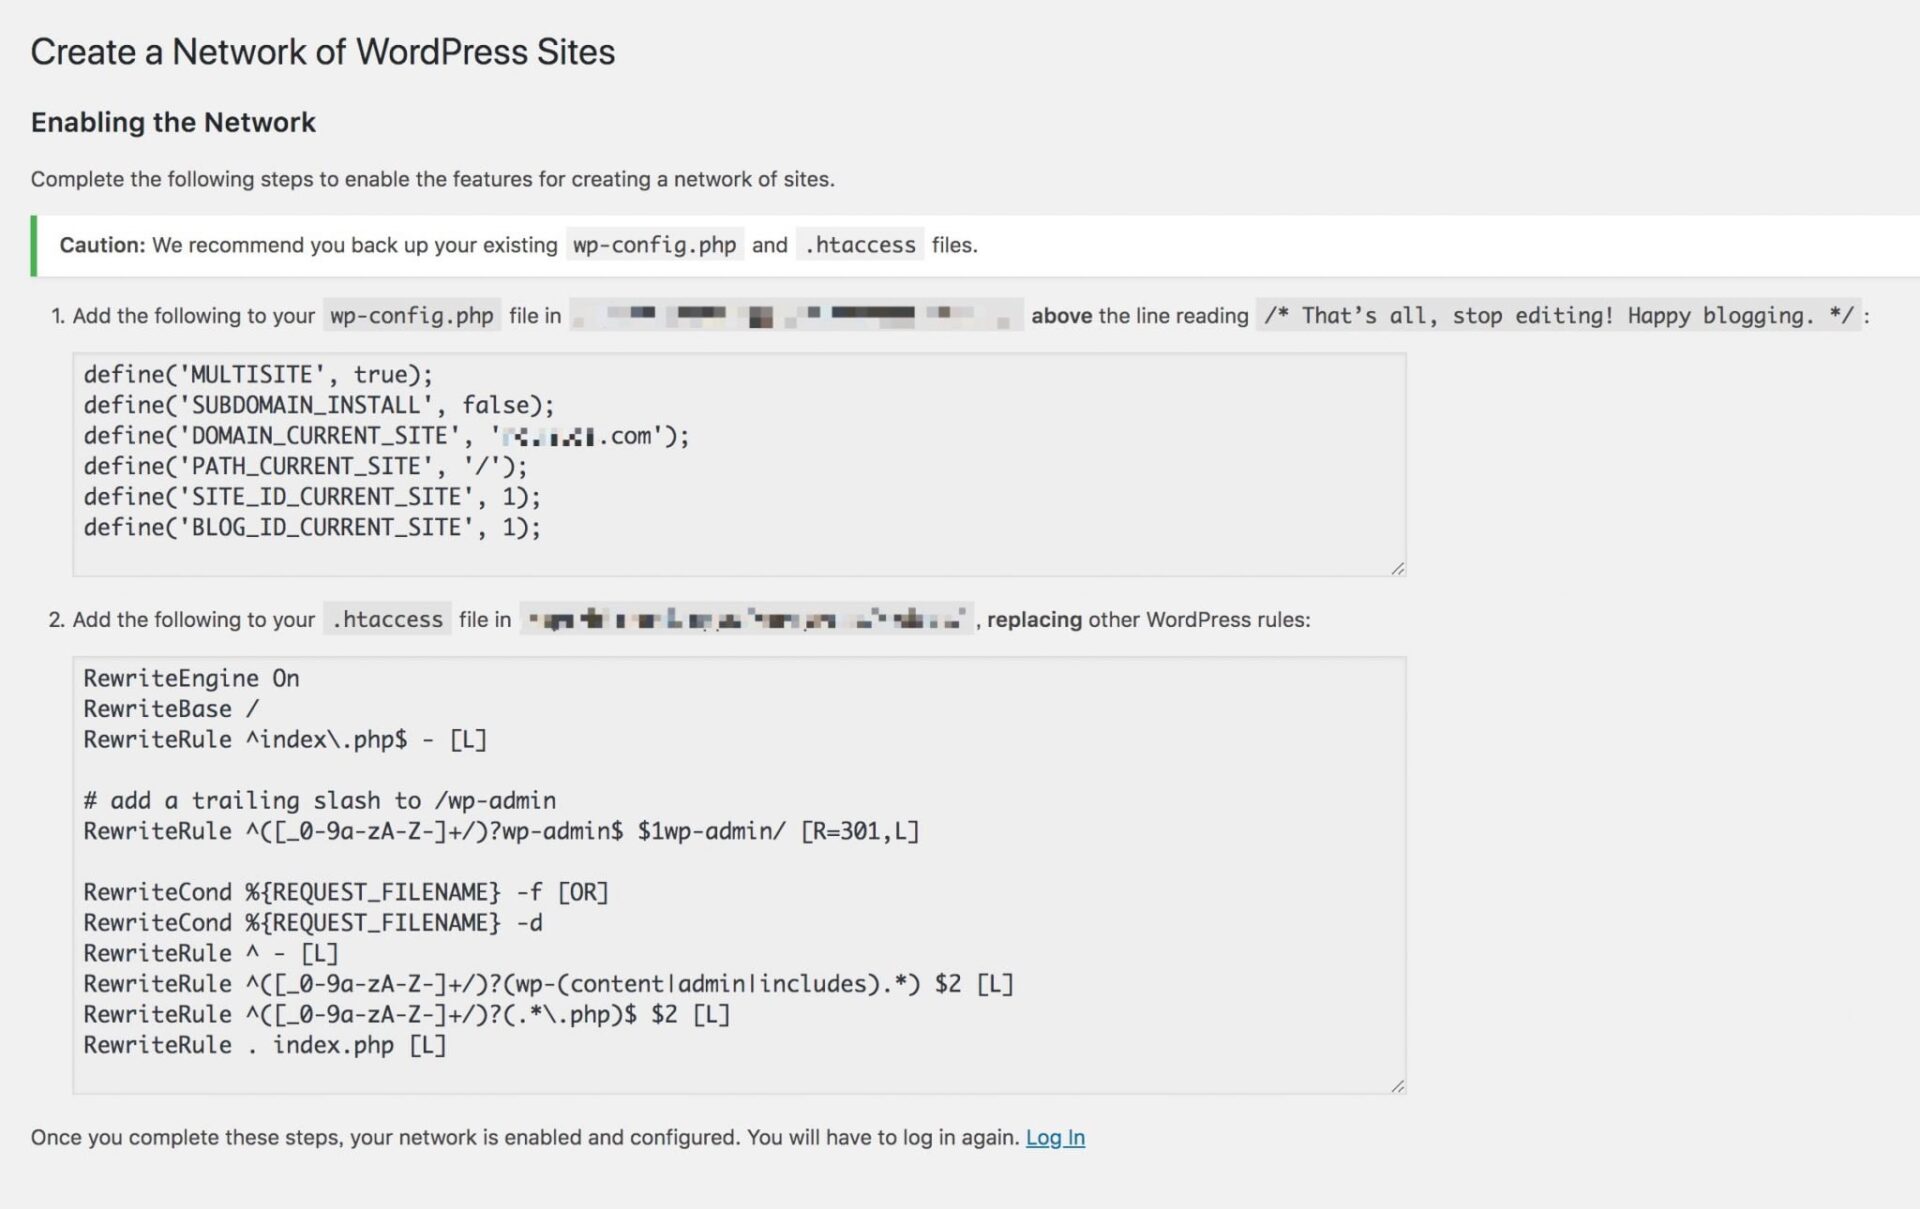 Adding required Multisite configuration lines to wp-config.php and .htaccess
Step 5: Once the configuration files have been saved, log out and log back into your WordPress dashboard. You will now have a fully operational Multisite network ready to manage subsites and network users.
Navigating the Multisite Network Dashboard
As seen below, the Multisite administrative dashboard introduces a dedicated “Network Admin” control center located in the top admin bar. This central hub allows you to create subsites, manage global users, and control theme/plugin availability.
Plugins can be “Network Activated” across all subsites at once, or left dormant at the network level so individual subsite administrators can activate them on demand. Certain plugins offer deep multisite configuration toggles, while legacy single-site plugins may need to be configured separately inside each subsite.
If you encounter third-party plugins that fail to operate correctly in a multisite environment, consult “WordPress MU Tutorial: Solutions for Plugin Incompatibilities in Multisite Networks (Using WP-Polls as an Example)”.
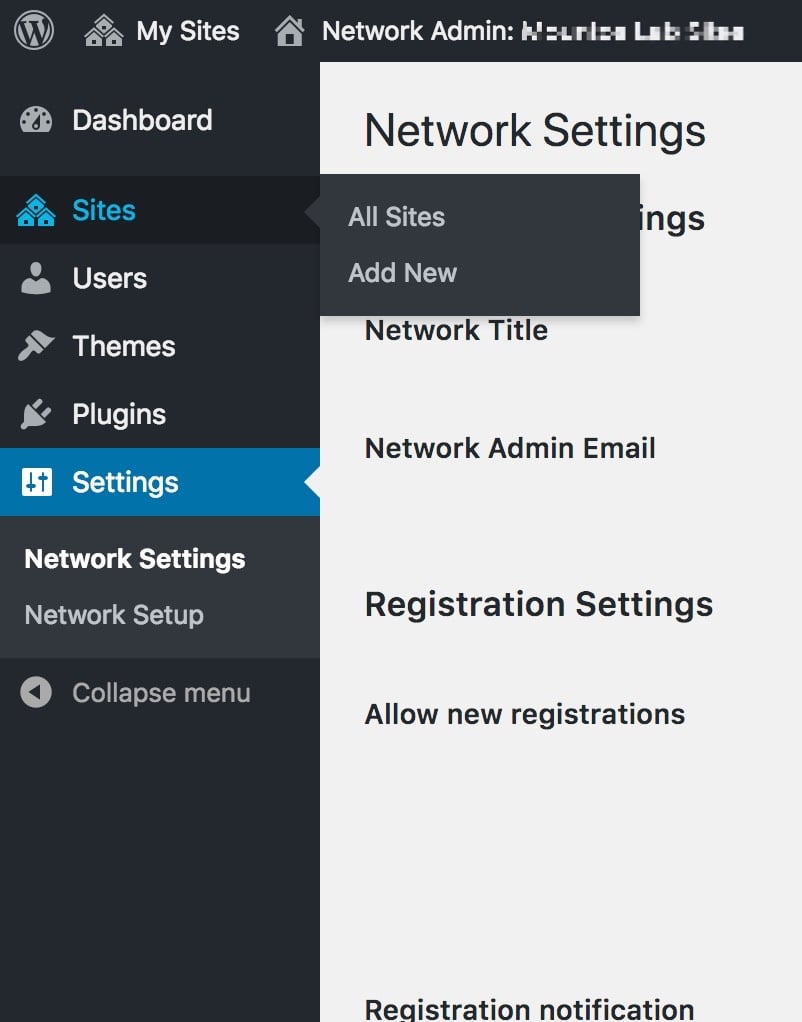 WordPress MU Multisite Dashboard
Important Considerations Before Installing Multisite
- Assign a Real Domain Name First: When WordPress is initially deployed, it might be accessed via a raw IP address. Ensure your real custom domain name is fully mapped in WordPress settings before enabling Multisite; initializing a network on an IP address can cause recurring routing failures.
- Subdomains vs. Subdirectories:
- Subdirectory Networks (
example.com/site1): Entirely handled by WordPress internal rewrite rules and Apache.htaccess. Requires no complex DNS configuration. - Subdomain Networks (
site1.example.com): Requires your DNS provider to support wildcard DNS records (*.example.compointing to your server IP), and requires your web server (Apache/Nginx) configuration to include wildcard server aliases (ServerAlias *.example.com). Ensure your hosting provider (such as Bluehost or custom VPS) supports wildcard routing before proceeding.
- Subdirectory Networks (
References
- WordPress MU Tutorial: Solutions for Plugin Incompatibilities in Multisite Networks (Using WP-Polls as an Example)
- WordPress Codex: Before You Create A Network (Domain-based section)
- WordPress Codex: Create A Network
Support Independent Perspectives & In-Depth Insights
Every thoughtful analysis and candid critique comes from our dedication to truth and quality. We choose not to follow sensational algorithms or clickbait headlines.
Sustaining independent research requires reader support. Make a one-time or monthly contribution, securely processed by Google.
Payments secured by Google · Manage or cancel anytime in your Google Account


Comments