

In our studio, besides everyone’s primary workstations, sits a shared relic of an ancient netbook: an ASUS Eee PC. Its main purpose in life is serving as a sandbox for OS enthusiasts, allowing us to install, experiment with, and benchmark virtually any operating system at will.
However, the netbook lacks an optical CD/DVD drive, and our studio has no intention of purchasing an external USB drive. Creating bootable USB flash drives for OS installation became an absolute necessity.
Fortunately, modern computer BIOS firmware widely supports booting directly from USB flash drives or memory cards. Once enabled in BIOS, you can boot into a USB flash drive and install Windows or Linux distributions—provided the installation files have been pre-configured onto the storage drive.
If you are looking to install Linux distributions such as Ubuntu, check out our companion guide: UNetbootin: Create a Linux Boot/Live USB Flash Drive (Supports Linux, Windows, Mac)[1].
This guide focuses on Windows XP, but the steps apply identically to Windows Vista, Windows 7, and Windows 8. Several lightweight utilities can transfer installation media to a USB drive, and WinToFlash remains one of the simplest standouts.
Introduction to WinToFlash
WinToFlash is a portable, standalone application (no installation required) that includes multi-language support. When launching it for the first time, it might suggest installing sponsor adware (WinToFlash Suggestor); simply decline or ignore it.
Download the package from the official site[2], extract the archive (written using Novicorp WinToFlash 0.6.0011 beta), and run WinToFlash.exe to see the main window shown in Figure 1.
Clicking the large green checkmark (“Windows Setup Bootable USB Wizard”) transfers installation files from your original Windows disc or image onto the target USB flash drive. WinToFlash then guides you through a step-by-step wizard.
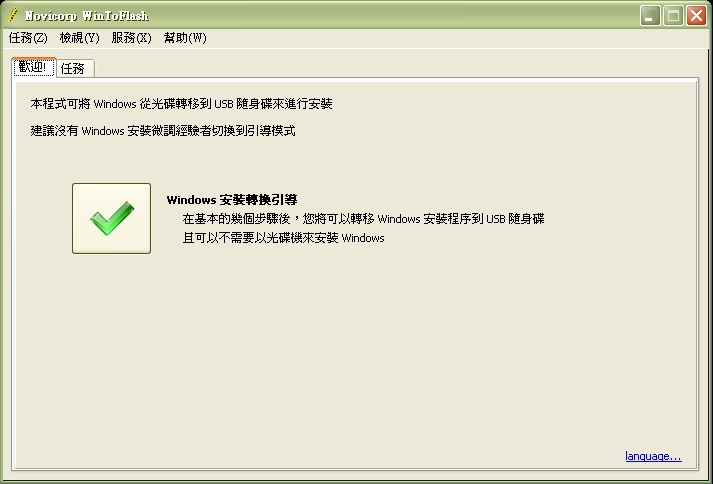
Figure 1: Main application interface
After clicking the green checkmark, the wizard prompt appears as shown in Figure 2. (Wizard mode is selected by default; simply click “Next” to continue.)
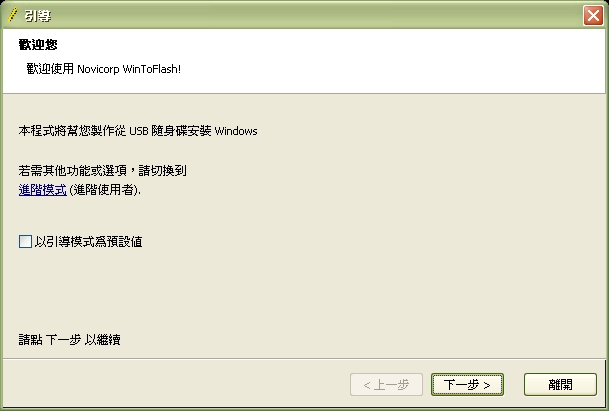
Figure 2: Wizard mode prompt
Next, the parameter configuration window appears, as shown in Figure 3.
Here, specify two primary inputs: the “Windows file source path” and the “USB drive.”
Designate the optical drive letter (or mounted virtual disc drive) containing the installation media, and select your destination USB flash drive or SD memory card letter. WinToFlash will automatically detect the Windows version and prepare the transfer.
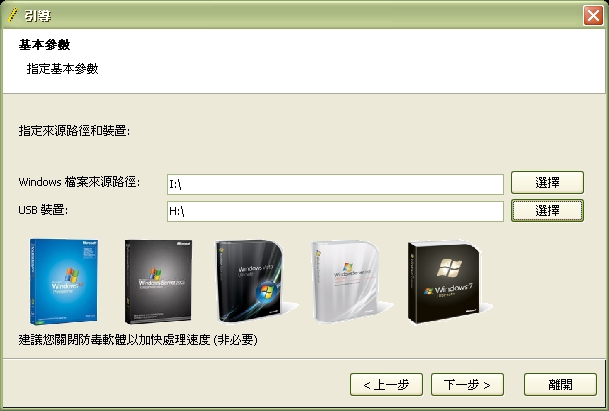
Figure 3: Configuration settings
Figure 4 illustrates WinToFlash actively copying and configuring installation files onto the drive.
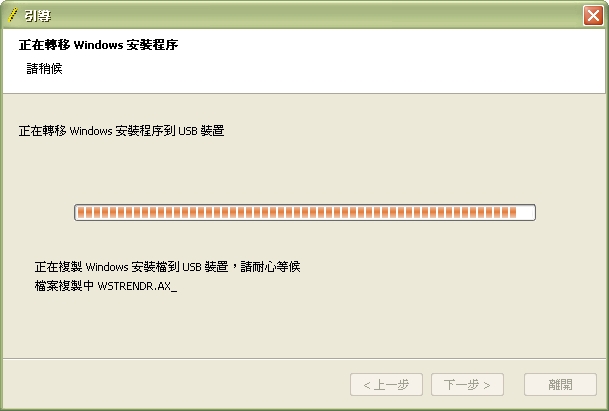
Figure 4: Transfer in progress
Once completed, a success notification appears as shown in Figure 5, listing operational reminders.
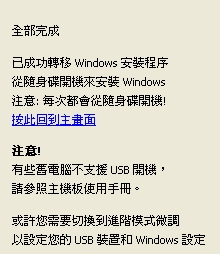
Figure 5: Completion confirmation
Installing Windows from Your Prepared USB Drive
To boot from the USB drive and begin Windows installation, insert the prepared flash drive into the target computer and set it as the primary boot device using either of these two methods:
- BIOS Setup: Enter BIOS settings (repeatedly tap the
DELkey immediately after power-on) and change the boot priority order so that “Removable Device” or your USB flash drive is ranked first. - Boot Menu: Tap the
ESCkey (orF2,F8,F11,F12depending on the motherboard brand) upon startup to summon the temporary boot menu, then select your USB drive as the boot target.
The system will bypass the internal hard drive OS and boot into the installer on the flash drive.
The WinToFlash boot loader will display a menu asking you to select the setup phase:
1st, text mode setup (Boot from flash again after finished)
2nd, GUI mode setup, continue setup + 1st start of Windows
For the initial run, select “1st, text mode setup (Boot from flash again after finished)”. The system will proceed with standard Windows text-mode setup partitioning and file copying.
If you wake up from a nap and find the message “Reboot and Select proper Boot device or Insert Boot Media in selected Boot device and press a key”, don’t panic. This means Phase 1 is complete. Press Ctrl + Alt + Delete to reboot, ensuring the computer boots from the USB drive again.
Upon reaching the boot loader menu a second time, select “2nd, GUI mode setup, continue setup + 1st start of Windows”. Within moments, the familiar Windows installation graphics will appear on screen.
Keep in mind that setup is not entirely finished yet. Go brew a fresh cup of coffee while the installer displays the classic estimate: “Setup will complete in approximately 39 minutes…”
Further Reading
- UNetbootin: Easy-to-Use Linux Boot / Live USB Creation Tutorial (Supports Linux, Windows, Mac).
- WinToFlash Official Download Page (Ver.0.8.0009 Beta).
Support Independent Perspectives & In-Depth Insights
Every thoughtful analysis and candid critique comes from our dedication to truth and quality. We choose not to follow sensational algorithms or clickbait headlines.
Sustaining independent research requires reader support. Make a one-time or monthly contribution, securely processed by Google.
Payments secured by Google · Manage or cancel anytime in your Google Account



Comments