

Originally, Mizuc planned to trek into the Shuiyang Forest in Chiayi on Taiwan Island, which required reviewing mountaineering skills that had faded with time. Alpine map reading and target orientation are indispensable safety techniques.
Learning Objectives for Alpine Map Reading and Orientation
- Map-based Orientation: Measure the “azimuth angle” (the horizontal angle clockwise from true north to the target) between a known destination and the starting point to determine travel direction.
- Field-based Orientation: Pinpoint an actual landmark onto the map or measure the azimuth angle of the target object.
- Forward Intersection (Resection): Sight at least two known reference points to determine the target’s position on the map.
- Backward Intersection (Resection): Observe two known landmarks in the field to determine your own position on the map.
Operation and Practical Instructions
The tools prepared for this exercise include a baseplate compass and a topographic mountaineering map.
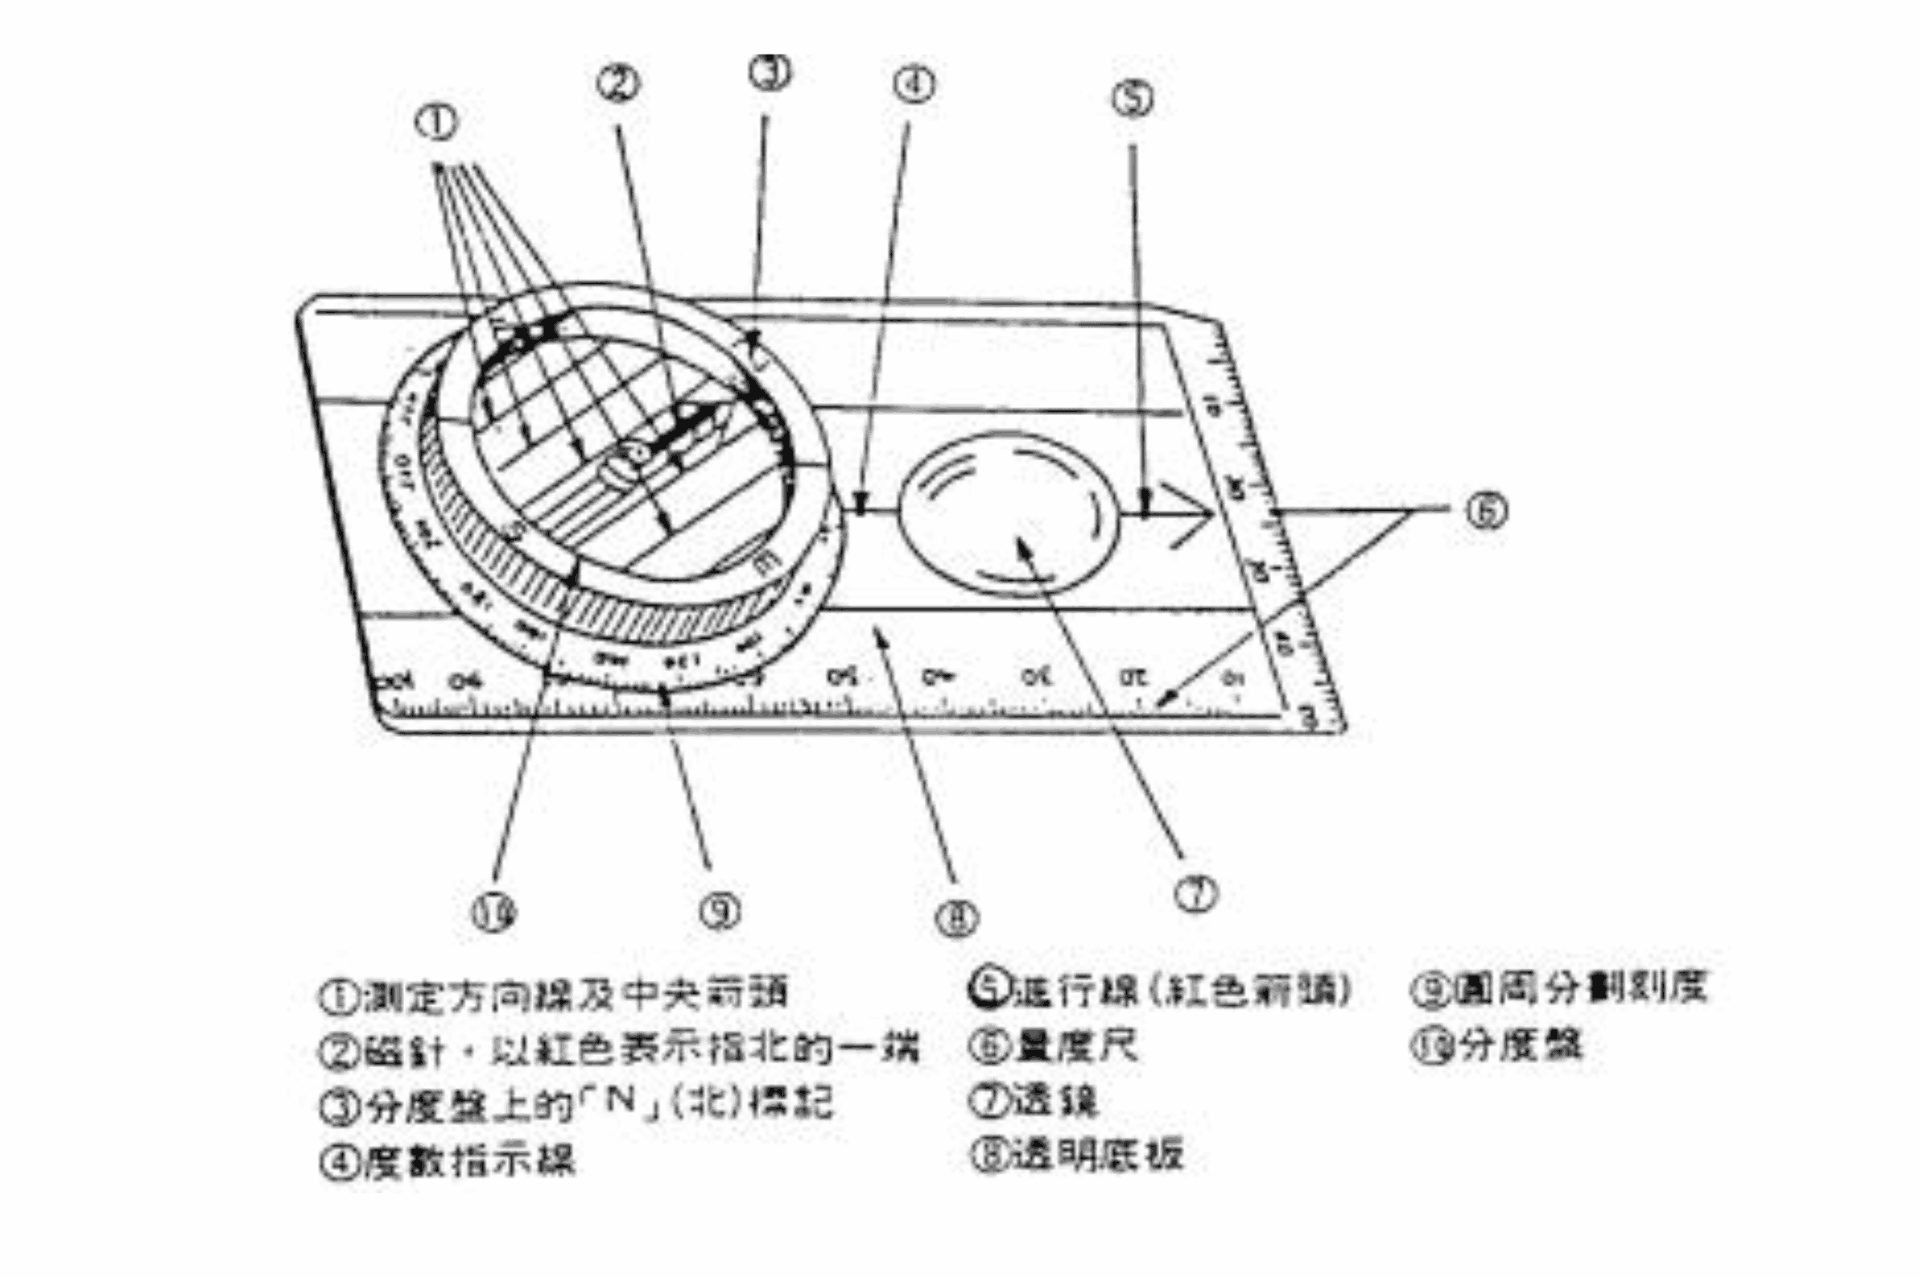
Structural diagram of a baseplate compass.
The compass I personally use is a transparent baseplate compass (refer to the diagram above for structural details), which is particularly suited for map reading.
Of course, if you are deeply passionate about this, purchasing an ultra-professional mountaineering compass is also an excellent option (dodges flying bricks).
1. Map-based Orientation (From Map to Terrain):
- Lay the compass flat on the map, aligning the baseplate edge between the “target (destination)” and the “starting point,” with the large “direction of travel arrow” pointing toward the destination.
- Rotate the “azimuth ring (dial)” until the orienting lines and the dial’s “N mark” align parallel with the map’s grid north / longitude lines.
- Read the azimuth degree marked on the dial index.
- Lift the compass from the map, hold it flat, and turn your body until the magnetic needle’s red “N end” aligns with the dial’s “N mark.” The direction of travel arrow now points toward your target.
2. Field-based Orientation (From Terrain to Map):
- Point the compass “direction of travel arrow” directly at the visible landmark in the field.
- Rotate the dial until the orienting lines are parallel to the magnetic needle, and the dial’s “N mark” aligns with the red “N end” of the needle.
- Read the azimuth degree at the index line on the dial.
- Place the compass flat on the map, align the orienting lines with the map’s grid longitude lines pointing north, and slide the edge to your position; the target lies along the extended line of the compass edge.
3. Forward Intersection (Triangulation):
- Select two known points, A and B. Let P be the unknown target location.
- Sight and measure the magnetic azimuth angles from A to P and from B to P.
- Convert magnetic azimuth to grid azimuth (accounting for magnetic declination).
- Plot the two bearing lines on the map; their intersection is point P.
4. Backward Intersection (Resection):
- Identify two known landmarks, A and B, in the field. Let Q be your current unknown location.
- Sight the magnetic azimuths from Q to A and Q to B.
- Convert magnetic azimuths to grid azimuths.
- Calculate the back-azimuths (reciprocal bearings: add or subtract 180°).
- Draw the lines from A and B using the back-azimuths; their intersection marks your location, Q.
Important Notes and Precautions
- The compass must strictly be protected from severe impacts and drops.
- Compasses are vulnerable to external magnetic interference. Avoid using them near iron/steel objects or around metallic rocky terrain during thunderstorms.
- For local magnetic declination data, besides consulting online resources (such as an online Magnetic Declination Calculator), virtually every semi-professional topographic map lists the local magnetic declination for easy reference.
- “Route analysis” means thoroughly studying the planned itinerary on the map beforehand. Cross-reference other maps, hiking journals, and past trip logs to evaluate terrain changes, bearings, crucial milestones, elapsed time estimates, steep ascents/descents, and distinct visual landmarks, compiling them into a pocket field reference.
Although modern outdoor gear features satellite GPS assistance, carrying an accurate topographic paper map paired with proficient orientation skills remains an indispensable safety backup.
However, remembering and mastering these techniques requires regular hands-on practice; leave them untouched for too long, and you’ll easily forget them all.
In this article, I have outlined these concepts based on my own understanding. If you wish to study the technical details more rigorously, consider referencing academic materials like Tunghai University’s “Map Reading and Map Navigation.” After all, I can’t guarantee my personal grasp is completely flawless!
Support Independent Perspectives & In-Depth Insights
Every thoughtful analysis and candid critique comes from our dedication to truth and quality. We choose not to follow sensational algorithms or clickbait headlines.
Sustaining independent research requires reader support. Make a one-time or monthly contribution, securely processed by Google.
Payments secured by Google · Manage or cancel anytime in your Google Account



Comments