
Steve Jobs gifted the world many memorable experiences. Near the top of that list is the unified software experience across Apple hardware—whether on an iMac, Mac Pro, Mac Mini, MacBook, MacBook Air, MacBook Pro, iPad, or iPhone—saving users from having to relearn completely different workflows across devices.
The built-in "**Photos Library**" app across iOS and OS X is a hallmark of this philosophy, bridging Apple hardware and operating systems seamlessly. Yet beneath its sleek interface lie several traps that often trip up beginners.
Apple maintains two major operating systems: OS X for desktop and laptop computers (iMac, Mac Pro, Mac Mini, MacBook, Air, Pro) and iOS for mobile devices (iPad and iPhone). Both feature robust Photos Library software offering comprehensive image management.
Note: With the introduction of tvOS for Apple TV, photos integrate across iOS and OS X. The advice here focuses on desktop Mac photo workflows.
While the iOS Photos app is optimized around the mobile camera hardware and touch gestures, the OS X desktop version introduces several convenience features that can easily lead to serious file management mistakes.
In short, I personally do not recommend relying on Apple’s built-in Photos Library for serious photo management, for reasons explained below.
If you don’t intend to master Apple’s proprietary database model, investing a little time in third-party applications like Adobe Bridge, Affinity Photo, or PhotoScape X will pay major dividends in the long run.
However, if you want to understand the core logic behind Photos Library, read on carefully—and keep these points firmly in mind to avoid losing irreplaceable photos.
Basic Features of Photos Library
Opening the Photos app on a Mac presents the main interface shown below in Figure 1:
Thumbnail sizes can be adjusted to personal preference, and photos can be organized chronologically by date taken or other criteria, making visual browsing effortless.
 Figure 1: Apple Photos user interface.
Photos inside the library typically originate from digital cameras, memory cards, external drives, or folders on your computer.
Connecting an external storage device automatically prompts the import utility. Alternatively, you can launch Photos manually and choose "**Import**" from the File menu (Figure 2).
 Figure 2: Photos File menu import option.
Here lies the critical detail: Photos Library does not manage images using transparent folders and files on your drive. This fundamental design choice is precisely why I advise caution.
The Photos Library File Structure and Container Model
As shown in Figure 3, all imported images are encapsulated within a single monolithic "**Photos Library**" database bundle on your storage drive.
In Figure 3, the database file shown weighs in at 15.48 GB (before cleanup, it ballooned to over 70 GB, consuming more than half the available drive space).
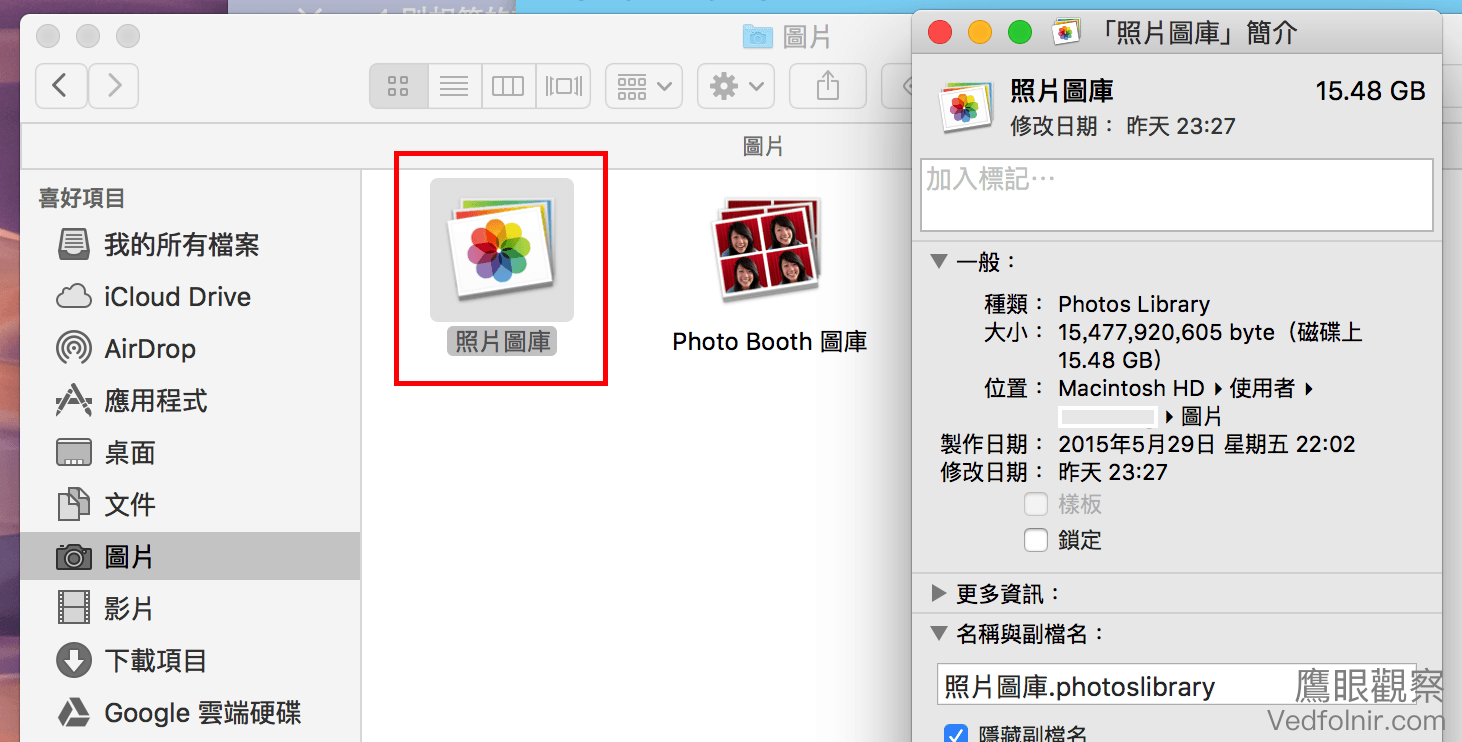 Figure 3: Photos Library database container package.
Double-clicking the .photoslibrary file opens the Photos application for visual management.
However, when your photo collection expands and drive space runs dangerously low, migrating that single massive container across drives becomes cumbersome and risky.
Establishing sound file management habits from day one is essential.
Inside this container, opening the "**Masters**" (or "**Originals**" in newer macOS versions) folder reveals your photos filed by year and month (Figure 4), housing the untouched original master files.
Next to "Masters", you will also see a "**Resources**" directory, where folders like "**Modelresources**" hold processed image cache files and thumbnails.
 Figure 4: Image storage folders inside Photos Library package.
This architecture reveals Apple’s internal logic: original files, thumbnails, and non-destructive edits all reside within one shared database. Attempting to manually move or delete files inside this package will sever the relational database links between originals and edits, causing library corruption and missing media errors.
In contrast, professional tools like Photoshop or Adobe Bridge treat original files as standalone entities resting safely in standard folders. Previews and edits live in distinct cache directories. The golden rule is clear: software can be uninstalled and caches can be purged, but original master files remain untouched and easily accessible.
If your image storage needs are light and you don’t mind letting macOS manage files behind the scenes, Photos paired with Preview functions adequately.
However, if you are a photographer or serious enthusiast, it is far wiser to avoid Photos Library. Instead, rely on standard folder structures managed through professional tools like Adobe Bridge, Lightroom, or Affinity Photo.
Photos Library and Preview Are Distinct Applications
While Photos handles image management and cataloging, Apple provides Preview for viewing and making quick standalone edits to individual image files.
Preview can be launched by double-clicking standard image files in Finder or launching it directly from Launchpad.
For an in-depth look at editing capabilities in Preview, see our dedicated guide: Apple Preview Is a Surprisingly Capable Image Editor.
Sharing and Exporting: Avoid the Drag-and-Drop Compression Trap
Once photos are imported, you can organize and browse them in Photos.
Opening an image for detailed viewing or editing can hand off tasks to Preview or external editors.
When you want to share an image online (e.g., Facebook, email) or pass it into third-party software, two common methods exist: "**Share Moments**" and "**Drag or Export Files**".
Sharing Moments
macOS includes a universal "**Share**" icon (Figure 5).
Clicking this button allows you to dispatch selected images directly to Mail, Messages, or social platforms.
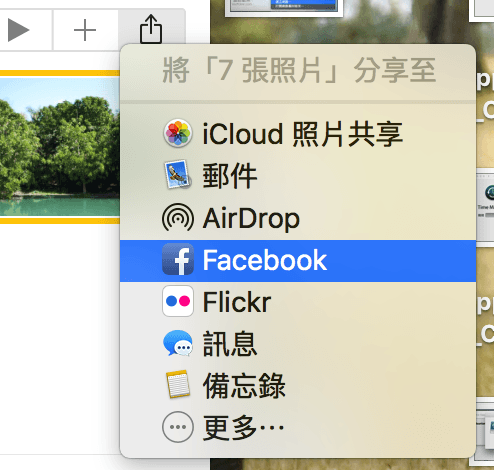 Figure 5: Sharing moments via system share sheet.
Dragging vs. Exporting Files
Because original media is locked within the internal database structure, accessing original files directly for Photoshop retouching requires extra steps.
To save image files to your desktop or working folders for external use, consider these two distinct methods:
Method A: Dragging Images (The Hidden Compression Trap)
When browsing Photos, clicking and dragging a photo or video directly onto your desktop or into a folder automatically generates a compressed JPG snapshot (Figure 6).
- If the original was a RAW file, Photos silently converts it into a compressed JPG.
- If the original was a high-resolution JPG, Photos still recompresses it.
Dragging also consumes background CPU and temporary disk space. If disk headroom is tight (less than 1 GB), export errors and truncated files frequently occur, especially with 4K video clips.
 Figure 6: Recompressed JPG files produced by dragging from Photos.
Method B: Exporting Unmodified Originals
Because dragging files causes Photos to silently recompress and downsample your images, it strips critical raw dynamic range and metadata, making secondary editing in Photoshop severely degraded.
Furthermore, when backing up images to an external drive or NAS, users who simply drag and drop folders out of Photos unknowingly back up lower-quality compressed proxies rather than their pristine original work.
A fundamental digital preservation principle: “Always preserve the untouched original master file.”
Technological raw-processing algorithms and personal editing styles evolve over time. Preserving the pure raw sensor data ensures you can reprocess your photos with modern tools years down the line.
To export pristine originals:
- Select the photos you want in Photos.
- Go to the menu bar: File > Export > Export Unmodified Original For… (Figure 7).
- Choose your folder naming and filename preferences, then click Export.
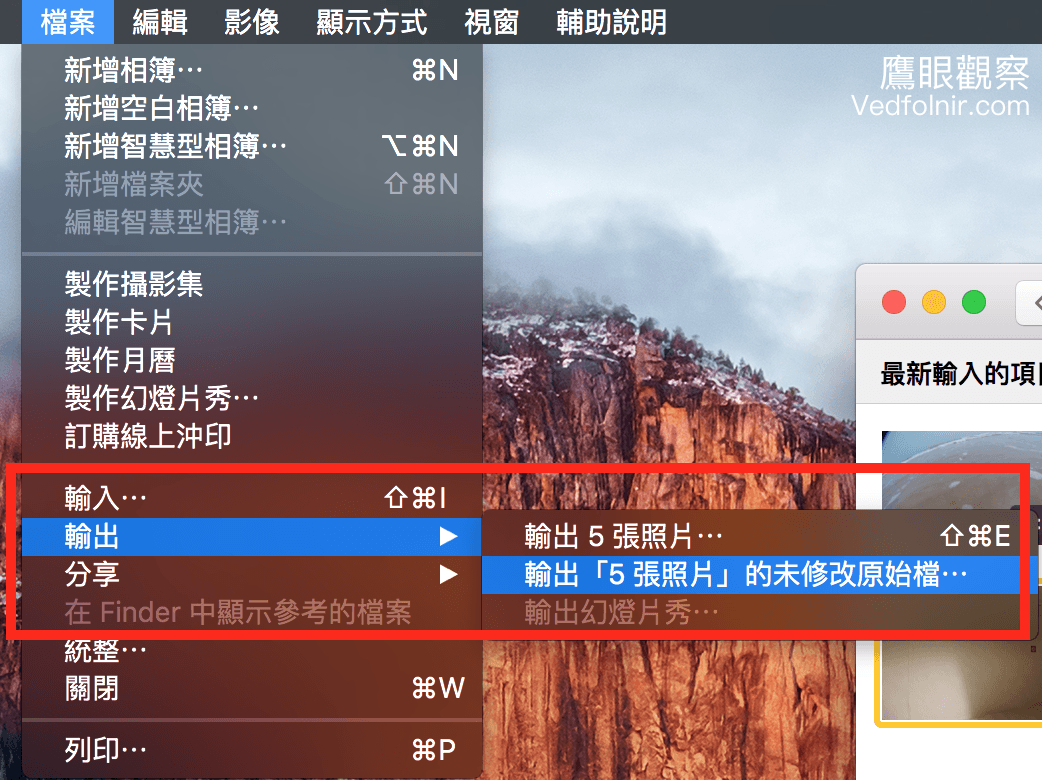 Figure 7: Exporting unmodified original files via the File menu.
As shown in Figure 8, unmodified original raw files (e.g., Sony ARW) land cleanly in your designated folder, complete with full resolution and original metadata intact.
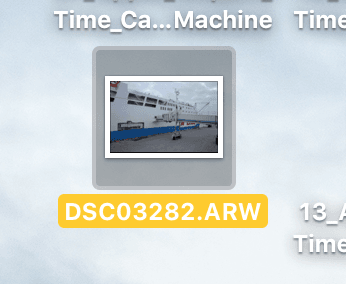 Figure 8: Pristine exported RAW files ready for Lightroom or Photoshop.
Software Recommendations and Ecosystem Choices
Readers often ask: between Affinity Photo, PhotoScape X, Adobe Bridge, and Lightroom, which tool should you choose?
Any application built on standard file and folder directory browsing will serve you well. Nikon shooters can utilize the free official Nikon NX Studio; Canon users have Digital Photo Professional.
For casual everyday editing with powerful one-click tools, PhotoScape X is capable and user-friendly. For professional workflows, Adobe’s photography plan (Bridge, Lightroom, Photoshop) or Capture One offers industry-standard cataloging and color grading.
While Affinity Photo is a capable one-time-purchase editor, its standalone cataloging features are more limited, making dedicated folder-based catalog managers a necessary companion.
Reader Q&A and Practical Troubleshooting
Following the publication of this guide, hundreds of Mac users shared similar struggles. Apple’s "black-box" packaged database model has caused endless frustration for creators wanting direct access to their raw media.
Here are the six most common dilemmas and proven recovery workflows:
1. Dragging Photos into Photoshop Results in Degraded Thumbnails (Reader Meile)
Reader Meile asks:
Apple support and local repair shops couldn’t answer this. When I drag photos directly from Photos into Photoshop for work:
- The resolution shrinks drastically and shows heavy compression artifacts.
- The filename changes automatically to
UNADJUSTEDNONRAW_thumb_....- The internal
derivativesfolder fills up with duplicate cached files.
Do I have to switch to third-party software to solve this?
Diagnostic & Solution:
This is the classic drag-and-drop trap:
- Why it happens: When dragging directly into external apps, macOS generates a quick low-res proxy thumbnail (
UNADJUSTEDNONRAW_thumb) in the temporary cache directory rather than linking the original raw file. - Immediate Fix: Never drag directly from Photos into Photoshop. Select the photos in Photos, go to File > Export > Export Unmodified Original, save them to your working folder, and open those exported files in Photoshop.
- Long-term Advice: For commercial graphic design and photo editing, transition to folder-based viewing software like Adobe Bridge, Lightroom, or Capture One.
2. Upgrading Old iPhoto Libraries Swallows All Available Disk Space (Reader Apple)
Reader Apple asks:
After updating macOS on an older Mac mini, opening my nearly 500GB iPhoto library in Photos caused it to hang at 34% for five hours. Finder then showed a new 293GB Photos library alongside the original 500GB iPhoto file. After deleting personal files to free up 68GB, the library ballooned past 600GB and froze the drive completely! How can I rescue this?
Diagnostic & Solution:
When migrating legacy iPhoto libraries, Photos creates an entirely new database structure, relying on file-system hard links and extensive cache generation:
- Root Cause: When remaining disk space falls below 15–20%, conversion tasks stall and duplicate corrupted cache entries.
- Step-by-Step Rescue Plan:
- Stop converting on the primary internal drive: Insufficient free space risks catastrophic database corruption.
- Copy the original library to an external hard drive: Ensure the external drive has ample free capacity (at least 1TB).
- Extract raw media directly (The Ultimate Fix): Right-click the
.photolibraryfile in Finder, choose"**Show Package Contents**", locate theMasters(orOriginals) folder, and copy the entire folder directly to an external drive. You bypass the broken conversion process entirely and rescue every pristine original photo safely.
3. Deleting Photos Library Didn’t Free Up Disk Space and Photos Won’t Launch (Reader Vivian)
Reader Vivian asks:
Because the library grew too big, I deleted it. But disk space was never freed up, and now clicking Photos throws an error: “Photos cannot find the system library ‘Photos Library.photoslibrary’”. How do I fix this?
Diagnostic & Solution:
- Disk Space Not Reclaimed: Moving a file to the Trash does not release space until you Empty the Trash. If already emptied, APFS local snapshots or Time Machine may be temporarily retaining purged space until the next system maintenance cycle or restart.
- Missing System Library Error: Photos expects the designated default library file. Hold down the
Option(⌥) key while clicking the Photos app icon. A library chooser dialog will appear. Click"**Create New...**"to generate a fresh, empty library, clearing the startup error. - Precaution: If the deleted library contained important photos and still sits in the Trash, duplicate it to a safe external location before attempting recovery.
4. How to Safely Extract Photos from an Old Library into Standard Folders? (Readers Elsa Wang & Jiang)
Readers Elsa Wang & Jiang ask:
Due to duplicate imports, our Photos library became an unmanageable mess. We want to switch completely to Adobe Bridge with Year/Month folders on an external hard drive. What is the safest way to extract everything locked inside the library?
Diagnostic & Solution:
Migrating to physical, transparent folder structures is the wisest long-term decision. Follow these rules:
- Never alter files directly inside Package Contents: Do not cut, move, or rename files within the internal package structure, as doing so will corrupt the SQLite relational index and crash Photos.
- Two Safe Rescue Pathways:
- Orderly Method (Recommended): Inside Photos, filter images by year or album, select all, and navigate to File > Export > Export Unmodified Original. In the export dialog, enable subfolder naming by date/event, saving them directly to your external drive.
- Fast Batch Copy Method: Right-click the library package in Finder, choose
"**Show Package Contents**", and copy the entireMasters(orOriginals) directory directly to your external hard drive. Then use Adobe Bridge’s batch rename and folder organization tools to sort files into your preferred taxonomy.
5. Smart Albums vs. Transparent Folder Structures (Readers worth2beloved & Cyh Yuhua)
Discussion:
- worth2beloved: Photos’ Smart Albums are powerful, allowing dynamic queries based on facial recognition, dates, and keywords.
- Cyh Yuhua: This breakdown clarifies everything. Why doesn’t Apple explain these operational realities upfront?
Reflections on Long-Term Data Ownership:
- The Walled Garden Trap: Smart albums and metadata tags provide temporary convenience inside a proprietary UI. However, they represent software-specific database views. If Apple discontinues a feature, or if you ever migrate to Windows or Linux, or connect a hard drive directly to a smart TV or NAS, those proprietary smart views evaporate completely. Only physical, directory-based folder organization remains universal and future-proof across decades.
- Why Apple Won’t Tell You: Apple’s business model thrives on ecosystem retention and iCloud storage subscriptions. Educating users on keeping pristine raw files independently accessible outside their walled garden runs contrary to their commercial incentives.
6. Replacing Map-Based Geotag Tracking for Bicycle Touring (Reader Scofield Huang)
Reader Scofield Huang asks:
As a cycle tourer, I love pinning photos across travel routes on a map. If I switch to external folder management, what can replace map-based tracking?
Recommendations:
As long as your camera or smartphone captures GPS coordinates, EXIF location data remains permanently embedded inside the raw file headers:
- Professional Desktop Solution: Adobe Lightroom Classic features a dedicated
"**Map Module**"powered by global satellite and street maps. Selecting any pin immediately surfaces every original photo taken at that geographic coordinate, regardless of whether images sit on internal drives or external archives. - Camera Vendor Software: Official software suites from Nikon (NX Studio) and Canon offer built-in GPS tracklog correlation and map visualization at zero cost.
- Cloud Photo Services as a Secondary Showcase: Keep your master raw files organized safely in offline folders, while exporting optimized lightweight JPGs to cloud services like Google Photos for mobile browsing and visual map timelines.
Support Independent Perspectives & In-Depth Insights
Every thoughtful analysis and candid critique comes from our dedication to truth and quality. We choose not to follow sensational algorithms or clickbait headlines.
Sustaining independent research requires reader support. Make a one-time or monthly contribution, securely processed by Google.
Payments secured by Google · Manage or cancel anytime in your Google Account



Comments