
Apple Inc.’s operating system, “Mac OS X” (now macOS), features an exceptionally user-friendly recovery environment called “OS X Utilities” (Recovery Mode).
This architecture allows users to reinstall the system without ever booting into the desktop environment. Unlike the days of Microsoft Windows where users had to hunt down installation discs or create bootable USB drives, any Mac with an internet connection can download a pristine official system image straight from Apple’s servers and complete installation effortlessly.
Speaking of reinstalling operating systems, it is impossible not to mention our team’s primary domain name, Mountos. From that name alone, you can probably guess that Bigman on our team used to be an avid enthusiast of reinstalling operating systems. Back in the Microsoft Windows era, he would wipe and reinstall his system nearly every month, claiming it was the only way to feel like a “brand-new person” upon rebooting.
However, after reinstalling Mac OS X on an Apple computer, you quickly realize that the performance difference before and after reinstallation is rarely night-and-day as it was on legacy Windows. That is largely due to Mac OS X’s inherently stable and well-architected Unix foundation. As long as you maintain reasonable usage habits, the need for an average user to perform a clean OS reinstall during the computer’s lifespan is far lower than you might think.
How to Boot into “OS X Utilities” (Recovery Mode)
Because “OS X Utilities” is embedded directly within the hardware recovery partition (Recovery HD) and system firmware, you must invoke it right when the machine boots:
- Shut down your iMac, Mac mini, or MacBook completely;
- Press the power button to turn it on, and the instant you hear the startup chime, immediately press and hold
Command (⌘)+Rsimultaneously; - Keep holding both keys until the white Apple logo and a progress loading bar appear on screen, then release.
If the timing and keystrokes are correct, the system will load into an isolated recovery environment and display the “OS X Utilities” window shown below.
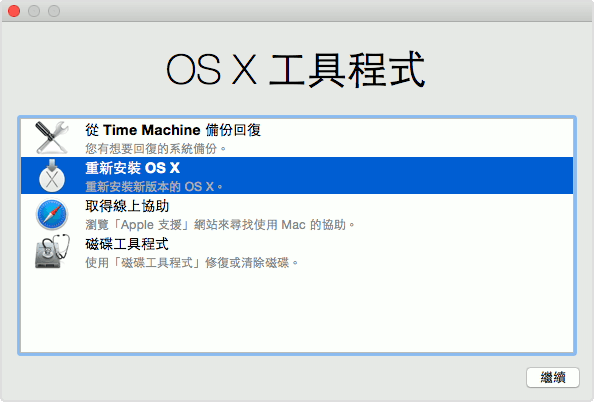
The Four Core Tools in “OS X Utilities”
The Recovery Mode interface provides four primary tools:
- Restore from Time Machine Backup: If you regularly back up your system using an external hard drive or an Apple Time Capsule with Time Machine, select this option to roll back your entire computer to an exact snapshot from a specific date and time.
- Reinstall OS X: The primary focus of this guide. This option downloads a clean copy of core system files directly from Apple and reinstalls them, preserving your personal files and user directory by default (unless you explicitly wipe the drive first).
- Get Help Online: Launches a streamlined version of Safari, allowing you to browse Apple’s official support forums and technical documentation even when you cannot boot into the desktop.
- Disk Utility: Provides partition management, disk permission repair, First Aid diagnostics, and full drive formatting/erasing. If you plan to sell, transfer ownership, or completely start fresh after severe system corruption, you must run this tool first.
The Reinstallation Process and 3-Stage Timeline
After selecting “Reinstall OS X”, the system will prompt you to connect to Wi-Fi or Ethernet to verify device eligibility, followed by selecting the destination target disk:

The overall installation process consists of three distinct stages:
- Stage 1: Downloading the fresh installer image: The duration depends entirely on your internet connection speed (installer packages typically range between 5 GB and 8 GB).
- Stage 2: Automatic extraction and system file deployment: The computer will restart automatically several times and write low-level system files while displaying the Apple logo on a black screen.
- Stage 3: Initial setup and account creation: Guides you through configuring an administrator account or signing in with your Apple ID.
Aside from download times governed by internet bandwidth, the extraction and writing phase typically takes between 30 minutes and a couple of hours (older Macs with traditional spinning hard drives may take longer). Ensure the power adapter remains securely plugged in throughout the process, and never force a shutdown mid-installation.
Essential Step: Performing a “Full Drive Erase” Before Selling or Giving Away Your Mac
If your goal in reinstalling macOS is to sell the device or hand it down to family or friends, remember never to jump straight into Reinstall OS X, otherwise your personal files and user folders may remain intact!
Here is the proper procedure for completely clearing your device:
- Boot into OS X Utilities, click the fourth option, “Disk Utility”, and click Continue;
- In the left sidebar, select the top-level internal startup drive (typically named
Macintosh HD); - Click the “Erase” button at the top toolbar;
- Select “Mac OS Extended (Journaled)” (or APFS for newer macOS releases) as the format, keeping the scheme set to GUID Partition Map;
- Confirm the erase operation. Once the progress bar finishes, quit Disk Utility to return to the main utilities screen;
- Now select the second option, “Reinstall OS X”, to perform a clean OS installation.
When the reinstallation finishes and displays the initial Welcome and Region Selection screen, press Command + Q immediately to shut down. This ensures the next owner will be greeted by the initial Setup Assistant when powering on—just like a brand-new factory Mac—while guaranteeing that none of your private data is left behind.
Support Independent Perspectives & In-Depth Insights
Every thoughtful analysis and candid critique comes from our dedication to truth and quality. We choose not to follow sensational algorithms or clickbait headlines.
Sustaining independent research requires reader support. Make a one-time or monthly contribution, securely processed by Google.
Payments secured by Google · Manage or cancel anytime in your Google Account




Comments