
For users who recently updated Microsoft Windows 10 (or were pushed an involuntary background update), you might find your screen resolution degraded terribly, or your desktop display area shrunken into an awkward low-resolution box. This problem stems from a driver matching conflict introduced by Windows 10.
Below is a troubleshooting guide compiled by our workshop team. Following these steps step-by-step should resolve the display resolution dilemma caused by the system update.
A reader reported having difficulty even getting into the operating system because the display showed garbled artifacts as soon as Windows booted. If you cannot reach the Windows 10 desktop normally, restart your PC and tap the “F8” key repeatedly every 3 seconds during POST bootup (or power cycle 2–3 times before boot completes to trigger the Windows Recovery Environment). When the recovery text menu appears, select Safe Mode. Once inside Safe Mode, proceed with the troubleshooting steps below.
Supplementary Note:
Among Microsoft’s recent Windows Update packages was an update for Display Card Drivers. After the system completed the update and rebooted, screen resolution unexpectedly plummeted to 1024 × 768 pixels. Because modern monitors virtually all run at 1920 × 1080 or higher natively, this distortion creates severe usability issues for users.
Check Windows 10 Screen Resolution
When you notice visual anomalies on your monitor, start by checking your display resolution settings.
In Windows 10, right-click on an empty area of your desktop and select “Display settings” to open the system display page. Next, click “Advanced display settings” at the bottom of the page to open the “Customize your display” dialog shown in Figure 1 below. Examine the “Resolution” dropdown menu.
Because modern monitors should display 1920 × 1080, if you can find the correct native resolution in the dropdown list, the issue was merely a temporary reset—simply select the correct resolution manually. However, if the native resolution is missing from the dropdown, or if Windows erroneously flags the distorted resolution as “Recommended,” your graphics driver has run into a conflict. Proceed to the next section.
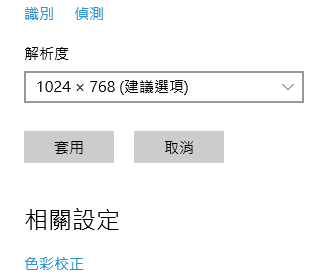 Figure 1: Distorted screen resolution settings.
Check Windows 10 Device Manager
Having ruled out manual configuration errors, open your system’s Device Manager.
How to launch Device Manager: Right-click the “Start” button in the lower-left corner of your desktop, then select “Device Manager” from the power user menu.
 Windows Start Button
As shown in Figure 2 below, look through the Device Manager list. We discovered four device items named “Media”, each flagged with a yellow exclamation mark icon indicating a driver malfunction.
Right-click each problematic entry to open its context menu, then select “Uninstall device” to decouple the conflicting driver from the system (repeating four times in the example illustrated in Figure 2).
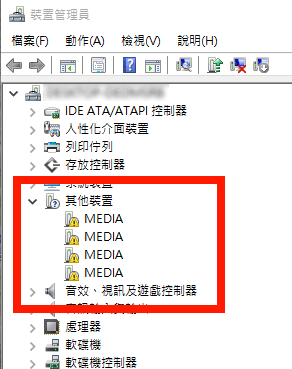 Figure 2: Device Manager driver warnings.
Once all corrupted entries are uninstalled, right-click any blank area inside the Device Manager window and select “Scan for hardware changes” to allow the system to re-detect missing hardware components.
As shown in Figure 3, Windows automatically locates and binds the correct driver profile, converting the previously faulty “Media” entries into healthy “NVIDIA High Definition Audio” devices.
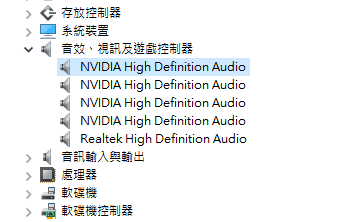 Figure 3: Device Manager showing restored hardware information.
Now return to your display settings (Figure 4). The resolution dropdown should properly list all native resolution modes supported by your graphics card, confirming that display functionality has returned to normal.
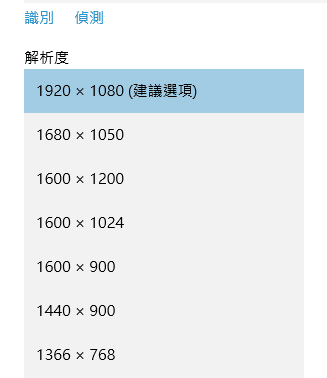 Figure 4: Complete list of supported native resolutions restored.
Because the desktop workstation used in our test ran an Nvidia graphics card, we could not immediately verify whether AMD/ATI cards encountered the exact same device naming anomaly.
If this walkthrough does not resolve your display issue, we recommend manually downloading the newest official display driver from your GPU vendor’s website (NVIDIA, AMD, or Intel). If issues persist even with clean driver installations, your graphics card or motherboard slot may have suffered physical hardware failure, warranting cross-testing with an alternate GPU.
Reader Q&A and Practical Troubleshooting (Synthesized from 62 Cases)
Following publication, an influx of readers hit by Windows 10 forced updates left feedback and requests for assistance. To help subsequent readers rapidly diagnose similar graphics conflicts, distorted resolutions, or black screens, we have distilled those 62 reader cases into 7 core troubleshooting themes:
1. “Media” Device Missing or Exclamation Marks Refuse to Clear?
Question from Lily:
After uninstalling the yellow exclamation mark device in Device Manager on my laptop and clicking “Scan for hardware changes,” the yellow warning symbol immediately reappeared. How can I fix this?
Diagnosis:
Simply uninstalling and rescanning without changing the driver source causes Windows to reinstall the exact same conflicting local cached driver. Head directly to the official vendor website for your GPU or laptop (NVIDIA / AMD / Intel) and manually install the latest package. If the GPU model is legacy and no longer maintained for Windows 10, roll back to the last certified stable legacy driver.
Question from Readers kerekr, Paul, Mo Yun, and Du:
Following the steps, I cannot find any “Media” or “Other devices” category in Device Manager. Or after updating the official driver, right-clicking the desktop still will not allow selecting the correct resolution, and the display adapter is labeled “Microsoft Basic Display Adapter.” What should I do?
Diagnosis:
- Device Categorization Differs Across Builds: In different Windows update revisions, conflicting GPUs may not be named “Media”; instead, Windows falls back to “Microsoft Basic Display Adapter” with a yellow warning tag under Display Adapters.
- Manual Driver Overwrite: Seeing “Microsoft Basic Display Adapter” confirms that the dedicated driver has failed to load entirely. Download the standalone installer package from your GPU vendor and run it; do not rely purely on automated Windows Update scans.
- Dedicated GPU Control Panel: If Windows Display Settings remain locked, launch NVIDIA Control Panel or AMD Catalyst/Radeon Software directly to enforce your native resolution (e.g., 1920 × 1080).
2. AMD / ATI Graphics Card Users: How to Handle the Update Fallout?
Question from Readers YI, HwChw (Asus EAH6850), and kerekr:
Does this guide apply to AMD / ATI graphics cards suffering from abnormal resolutions and failing GPU drivers after the Windows 10 update?
Answer:
Yes, completely! The issue stems from low-level matching conflicts between generic Windows Update drivers and vendor graphics hardware, affecting NVIDIA and AMD alike.
Standard remediation steps:
- Visit the AMD support portal and download the dedicated driver for your model on Windows 10.
- Uninstall the abnormal display adapter entry in Device Manager.
- Run the official AMD installer, reboot, and display resolution will be restored.
3. Startup Black Screen, Cursor Glitches, and Multi-Monitor Quirks
Question from Hsu Chan-yu and Lynn Chang:
After updating and rebooting, the screen went pitch black with no cursor. Or the next morning it booted to black, though the mouse cursor remained visible in Task Manager. How can I recover?
Guidance:
A black screen with the computer running usually indicates an out-of-range display refresh rate or an aborted driver initialization. Restart the machine and repeatedly tap “F8” (or hard-shutdown during boot 2–3 times) to access Safe Mode. Safe Mode boots with minimal baseline display drivers, allowing you to cleanly uninstall conflicting updates or perform a clean reinstall of your graphics drivers.
Question from Aduei:
After updating my desktop, booting to desktop works for 1–5 minutes before the screen abruptly goes black, yet Safe Mode works flawlessly. I updated the ATI Radeon 4830 driver to the latest release, but the black screen still occurs. Even removing the dedicated card and switching to Intel integrated graphics results in the same black screen. How can I fix this?
Analysis:
Working in Safe Mode while failing across both discrete and integrated graphics after several minutes in standard mode rules out a blown GPU chip. This points to "**startup item or background service conflicts**".
Boot into Safe Mode, back up important data, open Task Manager’s “Startup” tab and msconfig, and temporarily disable non-Microsoft background startup applications and third-party antivirus suites before rebooting.
Question from Pomme Hayase:
Monitor A produces a black screen on boot (worked fine in Win 7), but swapping to Monitor B or C works normally. Multi-display settings are scrambled. How can I fix this?
Answer:
Connect a working display or boot into Safe Mode to reset display refresh rates and resolutions. Monitors interpret EDID handshake signals differently; driver anomalies can cause legacy monitors to report “Out of Range.” Reinstalling original manufacturer GPU drivers and redetecting displays will resolve the issue.
4. Laptop-Specific Symptoms: Ultra-Dim Screens and Audio Loss
Question from Ah Wan and Wen Ru:
After upgrading my laptop to Windows 10, the screen continually dims on its own when idle or watching videos. Worse, after yesterday’s update, laptop audio completely vanished!
Guidance:
- Unwanted Screen Dimming: Updates often reset power plan settings to defaults. Navigate to Control Panel > Power Options and disable “Adaptive Brightness,” or disable energy-saving auto-contrast features in the Intel HD Graphics control panel.
- Simultaneous Audio Loss: Major Windows updates often impact audio chips alongside display drivers. Visit your laptop manufacturer’s driver portal to reinstall the sound card driver (e.g., Realtek High Definition Audio).
Question from Yang Kun-han and billsa:
My laptop boots to a black screen, but shining a bright flashlight directly at the display faintly reveals the desktop underneath. An external monitor works normally. The service center claimed the entire panel must be replaced—is that truly the only option? (GPU: AMD HD7600M)
Professional Insight:
An external display functioning normally combined with visible faint imagery under bright light confirms the GPU and motherboard are intact. The failure lies in the backlight system (e.g., backlight inverter, LED driver circuit, or worn display ribbon cable at the hinge).
Rather than spending exorbitant sums on a full OEM replacement, consult an independent panel repair specialist; often reseating the ribbon cable or replacing an inexpensive component completely revives the machine.
5. Hardware Aging and Contact Oxidation: The Pencil Eraser Trick
Question from Lien Chen-yu:
Removing the discrete graphics card and running integrated motherboard graphics makes the keyboard and mouse work normally. But plugging the GPU back in causes the keyboard to freeze and the monitor to display only a small box. What should I do?
Exclusive Tip:
This is a classic symptom of "**oxidized gold finger contacts or dust accumulation causing power/signal delivery failure**":
- Power off, remove the graphics card, and gently rub both sides of the PCIe gold fingers with an ordinary pencil eraser to clear away oxidation.
- Use an air blower and soft brush to clear dust from the card and the PCIe slot on the motherboard.
- Reseat the card firmly and fasten the retention screws. Normal operation should return.
Question from Wu Hung-yi:
My desktop has not been cleaned for years. After booting, the resolution jumps back to 1080p but freezes shortly after, falling back to low resolution. What should I do?
Answer:
Open the chassis upon booting and observe whether the GPU fans spin freely. Accumulated dust clogging heatsink fins causes thermal throttling, driver resets, and crashes. Thoroughly cleaning the dust and repasting thermal compound will significantly extend hardware lifespan.
6. Shrunken Software Windows, High-DPI Scaling, and Blur
Question from Jabez, Huazhiwan, and Milo:
The desktop looks normal after the upgrade, but software like SAI or Adobe products displays tiny UI icons. Alternatively, coming out of sleep clips the left side or blurs the center. Is lowering resolution a good workaround?
Answer:
- Stick to Native Resolution: Never compromise native resolution to accommodate legacy applications, as it blurs the entire system. Instead, right-click the software executable > Properties > Compatibility, and configure “High DPI scaling override” to let the application or system scale appropriately.
- Blurred Center or Window Offset: If specific portions of an LCD monitor look blurred or shifted, reconnect the video signal cable (HDMI / DP / DVI) and press the physical “Auto” calibration button on the monitor chassis.
7. Reader Recovery Confirmations and Appreciation
During widespread frustration caused by Microsoft’s aggressive updates, this troubleshooting guide provided timely relief:
- Reader Lin: “Reinstalling the driver as outlined fixed it immediately. Without this guide I never would have traced the issue, thank you!”
- Reader Long: “Thank you so much! I thought drawing on this PC was ruined for good. So thrilled it’s fixed!”
- Reader Felix: “Incredible help! I thought my brand new computer was broken and was almost in tears!”
- Reader Momo: “Out of nowhere my PC updated to Win 10 yesterday and the resolution became terrible. Thanks to your guide, the problem is totally resolved!”
- Reader Pipi: “Woke up to this exact headache this morning. This post saved my day, thank you!”
- Reader Chen You-lan: “Oh my goodness, thank you so much! You solved a gigantic headache!”
The Fixer’s Takeaway:
When computer anomalies strike, "**troubleshoot software before blaming hardware, and use structured deduction over blind reinstallation**". By methodically inspecting driver binding, leveraging Safe Mode, and reviewing Device Manager, most perplexing PC glitches can be resolved cleanly without wasting money on unwarranted repairs!
Support Independent Perspectives & In-Depth Insights
Every thoughtful analysis and candid critique comes from our dedication to truth and quality. We choose not to follow sensational algorithms or clickbait headlines.
Sustaining independent research requires reader support. Make a one-time or monthly contribution, securely processed by Google.
Payments secured by Google · Manage or cancel anytime in your Google Account


Comments