
Many administrators deploy their own cloud Virtual Private Servers (VPS) or dedicated servers. At initial launch, disk space may seem more than sufficient. However, without regular maintenance, one day you log in to execute a routine command, only to discover with horror that root partition usage has skyrocketed to 91%, leaving less than 9% free space!
In a Linux server environment, running out of disk space (Disk Full) is one of the leading causes of catastrophic system crashes. Once available space hits zero, MySQL / MariaDB databases crash immediately because they cannot write temporary tables, web servers fail to write session files resulting in mass user logouts, and even SSH services can lock administrators out because they cannot generate authentication tokens and temporary files.
When disk alerts sound, how do you quickly track down the culprits devouring your space? How do you safely release storage and implement lasting prevention? This guide outlines a standard operational procedure (SOP) for troubleshooting and cleanup.
1. Step One: Comprehensive Diagnosis to Pinpoint the Culprits
Avoid deleting files blindly! First, use terminal commands to narrow down the problem from high-level partitions down to specific directories.
1. Check Mount Partition Usage (df Command)
Run the following command to display all mounted filesystems in human-readable format:
df -hTypical output resembles:
Filesystem      Size  Used Avail Use% Mounted on
/dev/vda1        40G   36G  1.8G  95% /
udev            2.0G     0  2.0G   0% /dev
tmpfs           400M  1.2M  399M   1% /run
If the partition mounted at root / shows usage over 90%, you must drill down into the root filesystem.
2. Trace Largest Directories Step-by-Step (du Command)
Run this command to list the 10 largest top-level directories under root:
sudo du -sh /* 2>/dev/null | sort -hr | head -n 10Based on years of server maintenance experience, on most web servers—aside from user-uploaded media under wp-content/uploads—the most common space hog almost without exception is /var/log (system and web logs)!
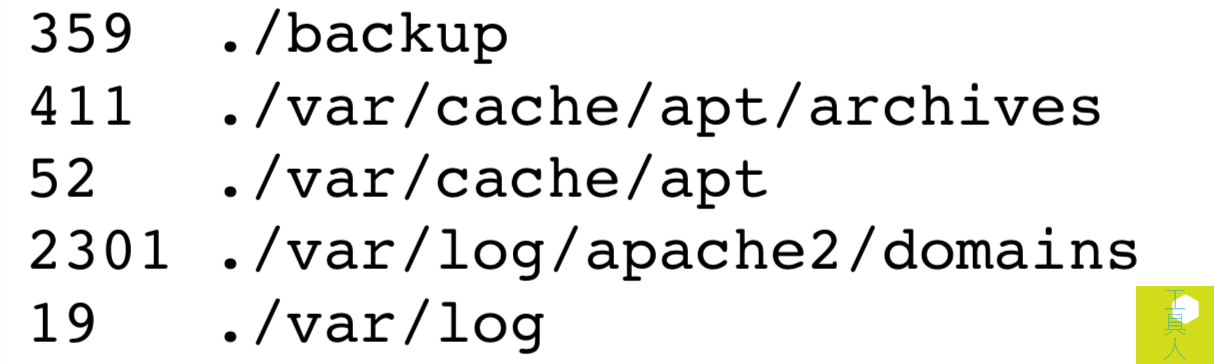
As shown above, when investigating further, you will often find that the single largest directory is:
var/log/apache2/domains (or Nginx site access.log files).
Long-running sites receive tens of thousands of legitimate visitors and web crawlers every day. Without automated truncation, access logs for a single domain can easily swell to 10GB or even 20GB+, silently eating up all available disk space.
2. Step Two: Clean Up Safely! Never Use rm Directly on Active Log Files
After locating gigantic log files, a novice’s immediate instinct is often to run: rm -f access.log.
CRITICAL WARNING: Never run
rmdirectly on active log files currently being written to by Apache, Nginx, or other running services! Under Linux, if a file is still opened by a running process, deleting its directory entry does not release the inode or disk blocks—the operating system keeps them allocated to that process. The consequence: the file appears gone, yet disk space is not freed at all! Worse, the web server may trigger errors because its log file handle is broken.
The Correct Method: Safe Log Clearing via Truncation
Use shell redirection or the truncate utility to reduce the file size to zero immediately without restarting processes:
# Method 1: Use redirection to empty specific logs
sudo sh -c '> /var/log/apache2/domains/yourdomain.com.error.log'
sudo sh -c '> /var/log/apache2/domains/yourdomain.com.log'

# Method 2: Empty standard system logs using truncate
sudo truncate -s 0 /var/log/apache2/access.log
sudo truncate -s 0 /var/log/syslog
3. Step Three: Clear Package Caches and Old Kernels
Beyond web logs, package managers and temporary directories accumulate substantial amounts of clutter over time:
1. Clean APT Package Cache (Ubuntu / Debian)
Every time you run apt update and apt upgrade, downloaded .deb packages stay cached locally:
# Remove cached packages that have been downloaded
sudo apt-get clean

# Automatically remove orphan packages installed as dependencies but no longer needed
sudo apt-get autoremove --purge -y
2. Clean YUM / DNF Package Cache (CentOS / RHEL)
sudo yum clean all
sudo rm -rf /var/cache/yum
3. Clear Temporary Directory /tmp
Inspect /tmp and /var/tmp for leftover large archives or temporary build artifacts:
sudo rm -rf /tmp/*4. Step Four: Permanent Prevention! Configure Automated Log Rotation with Logrotate
Emptying logs only treats the symptom; without proactive controls, disk space will fill up again within weeks. The fundamental solution lies in setting up a proper “log rotation (logrotate)” mechanism.
Linux systems include the logrotate utility by default. Inspect your Apache configuration at /etc/logrotate.d/apache2:
sudo nano /etc/logrotate.d/apache2Ensure configuration directives specify daily or weekly rotation, compression, and retention limits:
/var/log/apache2/*.log /var/log/apache2/domains/*.log {
    daily               # Rotate daily
    missingok           # Ignore if log file is missing
    rotate 7            # Keep at most 7 days of historical logs
    compress            # Compress old logs with gzip (saving ~90% space)
    delaycompress       # Delay compression until the next rotation cycle
    notifempty          # Do not rotate empty logs
    create 640 root adm
    sharedscripts
    postrotate
        /etc/init.d/apache2 reload > /dev/null
    endscript
}
After saving, force a dry-run test to verify logrotate executes without errors:
sudo logrotate -f /etc/logrotate.d/apache25. Step Five: Real Business Growth: How to Expand Disks Online
If your investigation confirms that disk consumption is entirely driven by authentic user media uploads or database growth rather than temporary logs, your website traffic and scale have matured—it is time to upgrade your VPS disk capacity.
Leading cloud providers (such as Linode, DigitalOcean, AWS EBS, GCP, and Bluehost VPS) support “seamless online disk capacity upgrades” directly from their management consoles:
- Resize in Console: Increase the allocated storage disk size from 40GB to 80GB in your host control panel.
- Resize Partition Online (Zero Downtime):
# Install growpart utility sudo apt-get install cloud-guest-utils -y # Extend partition 1 on disk /dev/vda sudo growpart /dev/vda 1 - Expand Filesystem (Resize):
# For ext4 filesystems: sudo resize2fs /dev/vda1 # For XFS filesystems: sudo xfs_growfs / - Re-run
df -hto verify that capacity has grown from 40GB to 80GB instantly without interrupting any running services!
Conclusion: Proactive Server Maintenance Mindset
In server administration, the worst practice is “neglecting maintenance until a crash forces an emergency response”.
Spend 10 minutes reviewing your server’s logrotate settings, and configure a simple daily cron monitor: when df -h reports root usage surpassing 80%, send an automated Telegram or email notification to administrators. Staying ahead of disk consumption ensures your website runs smoothly, reliably, and without unexpected outages.
Support Independent Perspectives & In-Depth Insights
Every thoughtful analysis and candid critique comes from our dedication to truth and quality. We choose not to follow sensational algorithms or clickbait headlines.
Sustaining independent research requires reader support. Make a one-time or monthly contribution, securely processed by Google.
Payments secured by Google · Manage or cancel anytime in your Google Account




Comments