
You might know—or even frequently use—Google’s Google Maps service, but you might not know how Mizuc uses Google Maps to travel the globe.
If you are planning a trip with friends to destinations like Japan, New Zealand, Thailand, South Korea, or Europe, you can take advantage of Google’s “My Maps” feature to craft exclusive custom itineraries, effortlessly orchestrating a diverse and unforgettable adventure!
The Mizuc travel maps shared across my articles are created, edited, and managed using Google My Maps. I wholeheartedly recommend everyone make good use of this convenient, free tool.
Below, I walk through step-by-step instructions on customizing Google Maps (My Maps). Refer to the table of contents below for specific sections.
Prologue: Before Getting Started with My Maps
Ever since Google entered the mapping landscape with Google Maps, it has been the world’s leading cloud mapping provider.
Many prominent tech companies partner with Google for mapping infrastructure, creating a substantial revenue engine for the company (which is also why Apple moved aggressively to carve out a share of the space).
Yet regardless of how powerful Google is, some platforms opt out. For instance, Facebook opted to partner with Microsoft’s Bing Maps.
However, the geographic names used by Bing Maps frequently differ from local naming conventions. For example, the official English romanization for Tamsui is Tamsui (formerly Danshui). Google successfully resolves queries for both Tamsui and Danshui, whereas Bing Maps only accepted Tanshui.
Mizuc has submitted corrections to Microsoft multiple times, though whether they were adopted remains unclear.
While historical naming discrepancies may seem minor, for travelers they can spell disaster. For example, in Pacific islands using Austronesian names or regions using Arabic, names can be exceedingly long with many characters while differing only slightly between locations.
This is precisely why I consistently recommend Google Maps: it may not always be the prettiest, but it is currently the most comprehensive and accurate map available.
Interestingly, when traveling in mainland China, many Google services are inaccessible locally (for reasons everyone understands).
The mapping service proved to be an exception. This allowed me to continue utilizing the immense geographic database and convenience while traveling across mainland China, surprisingly turning Google Maps into an officially tolerated utility (though with the rise of Baidu Maps, dynamics may evolve).
2016.07.28 Update: A reader reported being unable to access Google Maps reliably while in mainland China, validating the unpredictability I noted two years ago. When traveling in mainland China, one can switch to Baidu Maps, though positioning precision tends to be lower.
Beyond the standard Google Maps application, Google provides a custom mapping service: “My Maps”.
🏠 Official Website: “Google My Maps”
While this service is completely free, it offers more than enough capability for travelers and backpackers to design engaging and detailed itineraries. It is equally suited for corporate team-building retreats, club outings, or student graduation trips.
Crafting a clear, readable travel map before departure and sharing it with the group will surely earn you a reputation as a savvy travel expert among colleagues and friends.
Best of all, beyond pinpointing attractions and routes, built-in cloud sharing and collaborative editing allow companions to co-create the itinerary beforehand, fostering engagement—and revealing incompatible travel partners early.
2015.06.28 Update: My Maps no longer differentiates between enterprise and free lite editions; all features are now freely accessible.
2015.07.27 Update: Reader Ming pointed out that layer limits still apply. Testing confirmed that adding an eleventh layer prompts a notification: “This map has reached the layer limit.” See the “Restrictions & Guidelines” section below for full details.
Section 1: Step-by-Step Guide to Customizing My Maps
Step 1: Open the “My Maps” website in any web browser (Google Chrome, Internet Explorer, and Apple Safari are all supported).
As shown in Figure 1, you will first see the Google My Maps manager, storing all previously created custom maps as well as publicly shared maps you have viewed.
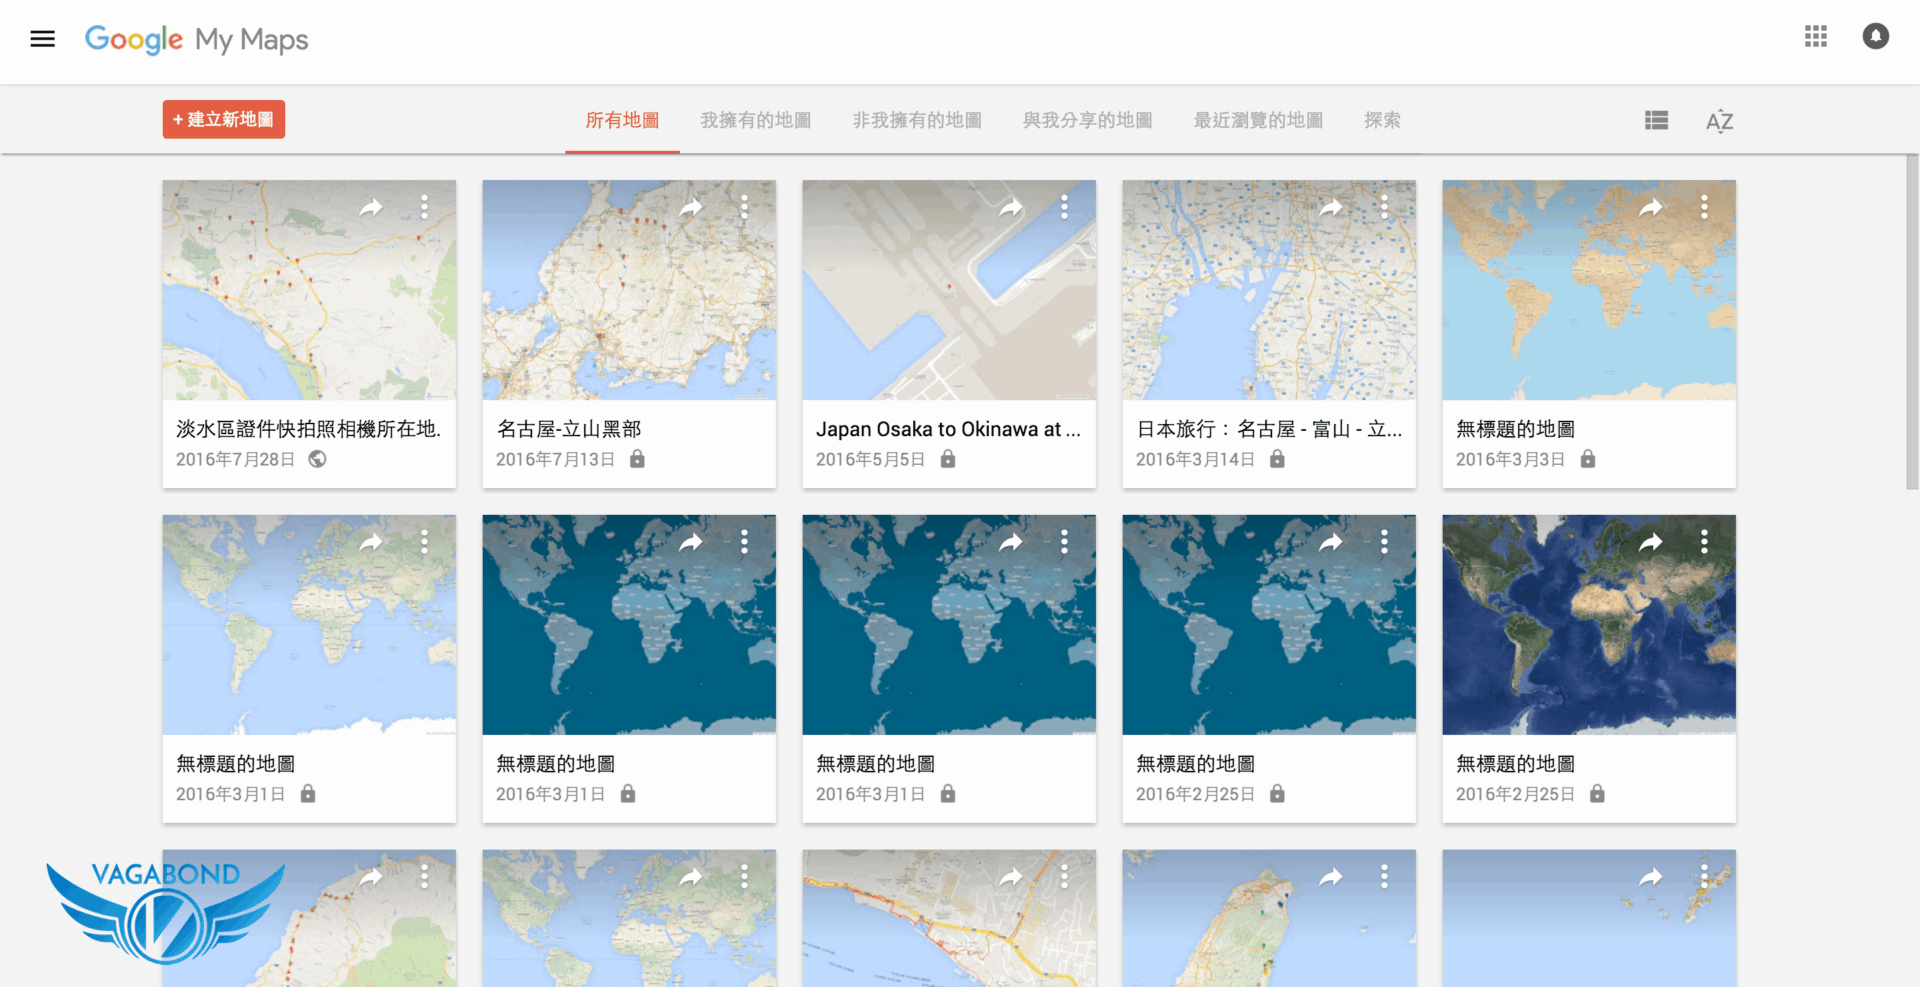 Figure 1: Google My Maps manager (2016 revised interface).
Mizuc recommends deleting empty maps promptly; creating a new map automatically generates a file, which can accumulate clutter over time.
These map files are stored in Google Drive. If manual deletion via the map manager feels too slow, you can delete them directly within Google Drive.
Step 2: After creating a new map, you enter the interface shown in Figure 2 below. The numbered callouts correspond to:
- File and Layer Management Panel: Used to “Add layer”, “Open saved map”, “Create point details”, “Add directions layer”, and “Change base map type”;
- Search Bar: Enter place names, store titles, or addresses to search for hotels, dining, transit, and scenic attractions; and
- Custom Map Toolbar: Explained in detail below.
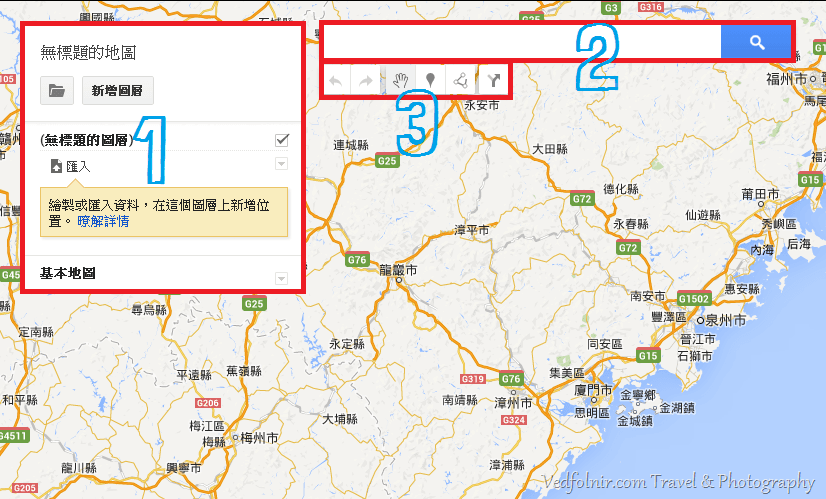 Figure 2: Custom map interface overview
2015.06.28 Update: In the updated My Maps interface, a “Ruler” tool was added to the toolbar, as shown in Figure 2-1 below, addressing a critique I raised when first drafting this article.
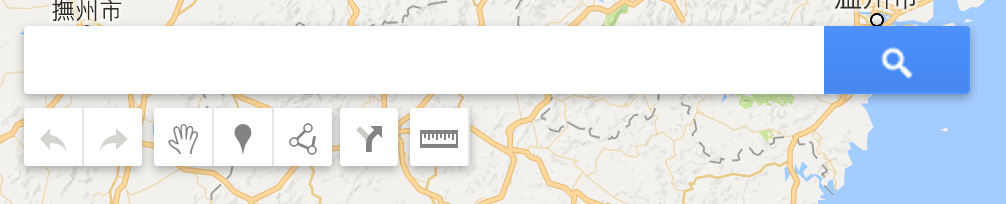 Figure 2-1: My Maps toolbar.
Next, let’s explore the custom map toolbar.
Step 3: As shown in Figure 3, the toolbar contains key tool blocks:
 Figure 3: Toolbar overview
- Undo / Redo: Standard edit history actions to revert or reapply steps.
- Select Items: Pan the map or click existing landmarks, hotels, restaurants, transit points, or scenic attractions.
- Add Marker: Custom-pin specific coordinates—useful for remote locations not listed in the directory, hiking trailheads, or personal memorial spots.
- Draw a Line: Draw single or continuous line segments to indicate paths or boundaries rather than routed directions.
- Add Directions: Create navigation route layers. Earlier personal editions allowed only 2 directions layers, but after Google removed commercial tier gating, up to 10 directions layers can be added (see Step 18 below).
- Measure Distances and Areas (Ruler): Added in the updated interface to measure route lengths and geographic areas (Figure 3-1).
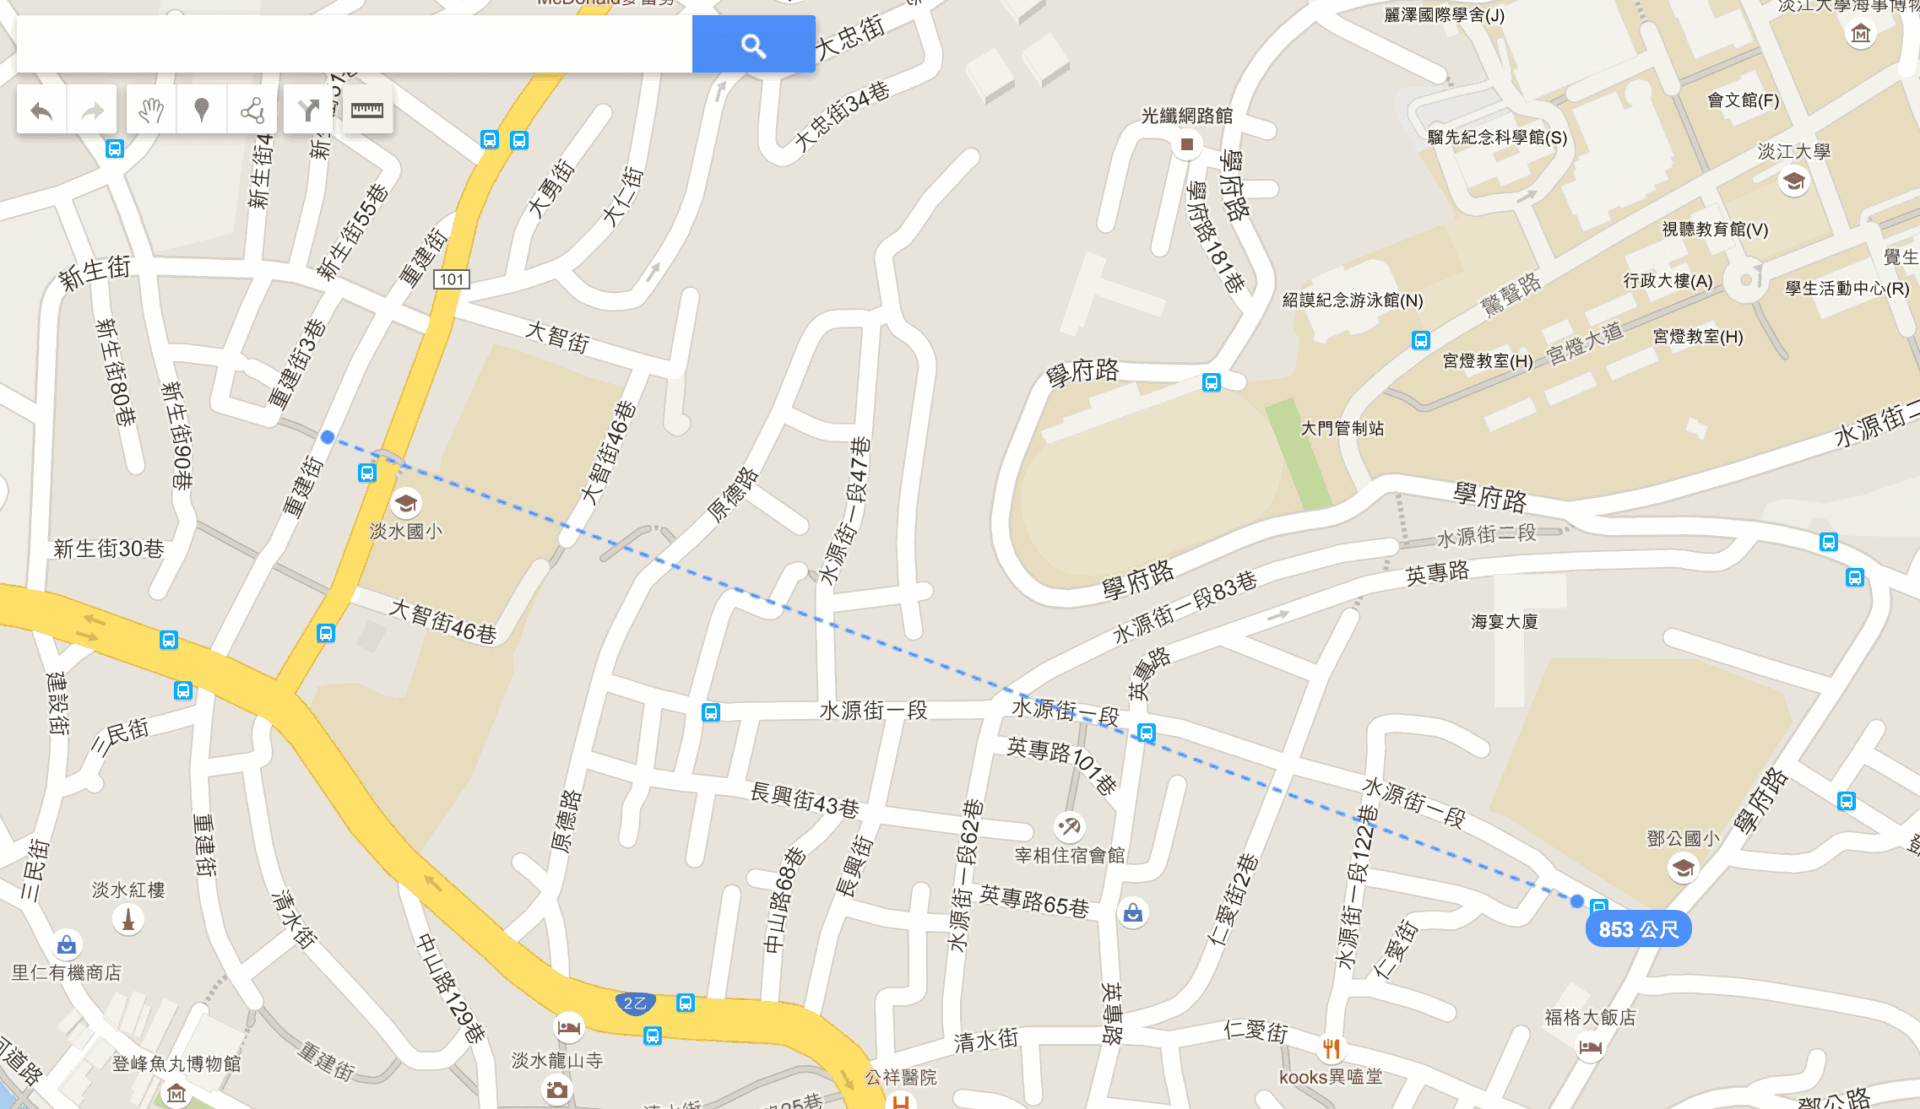 Figure 3-1: Map ruler application example.
Step 4: To understand the detailed workflow, observe the examples in Figures 4 and 5 below.
Referring first to Figure 4, select “Add marker” or “Draw a line” (Callout 1) to place geographic points or lines on the map (Callout 2).
The layer panel on the left (Callout 3) will then display the corresponding locations (attractions, restaurants, outdoor activities) and line data.
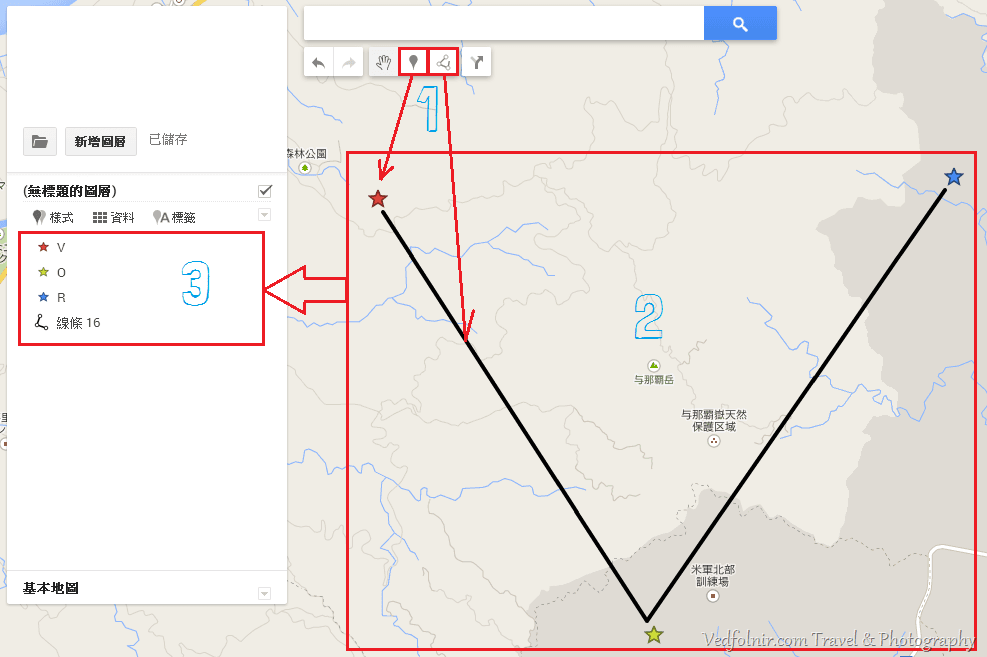 Figure 4: Adding markers and lines diagram
Step 5: As shown in Figure 5, if you search by landmark, store name, or address (Callout 1), the search result pane (Callout 2) displays matching points of interest, and the map (Callout 3) marks the spot with a coordinate pin (defaulting to a bright green pin).
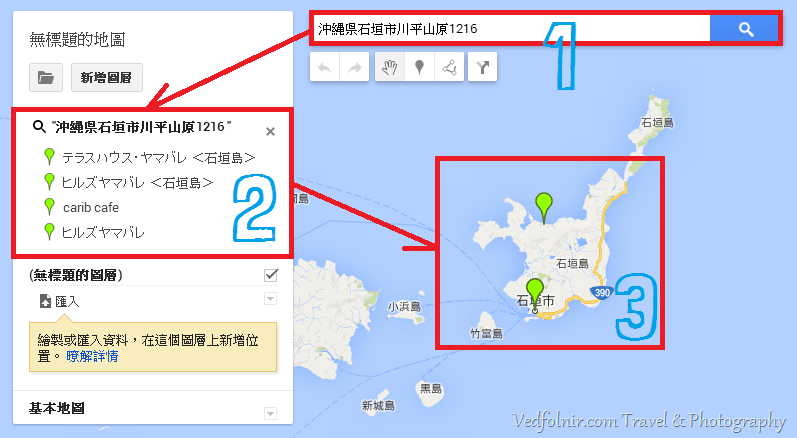 Figure 5: Searching for points of interest
Step 6: Continuing from Step 5, clicking the search result (Callout 1) or the marker pin (Callout 1’) pops up the point details card (Callout 2), as shown in Figure 6.
At the bottom left of the card, click “Add to map” (Callout 3) to save the location permanently to your custom layer.
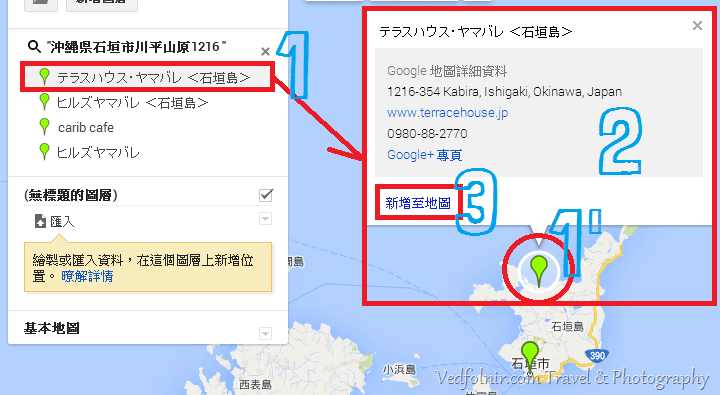 Figure 6: Adding search results to the layer
Step 7: In Figure 7, once the location (Callouts 1 and 1’) is added to your layer (Callout 2), the marker changes from bright green to an editable reddish-orange pin, confirming it has been added to your dataset.
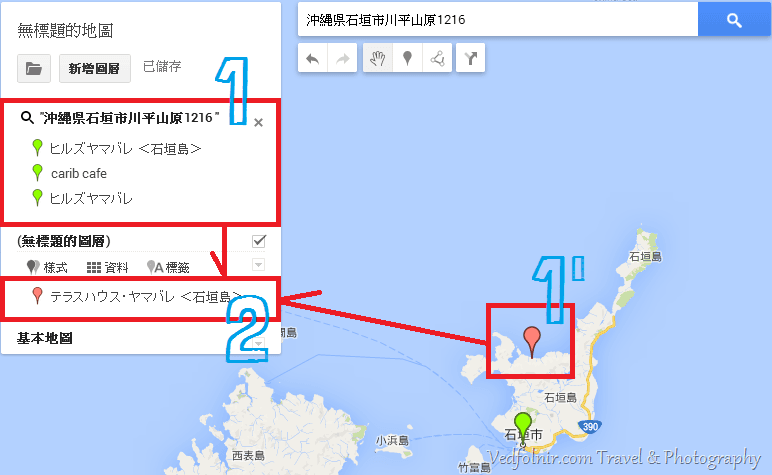 Figure 7: Landmark added successfully
Mizuc Note: Bright green indicates temporary Google Maps search pins; reddish-orange (or custom colors/icons) signifies saved user coordinates.
Summary of Core Workflow
Steps 1 through 7 guide you from scratch through creating geographic locations (attractions, dining spots, transit stations, activities) on My Maps.
Crafting an enjoyable trip fundamentally relies on arranging balanced points of interest across each day.
Add every spot and shop that piques your interest into My Maps, giving your companions a comprehensive overview of your itinerary.
Section 2: Real-World Example in Google My Maps
As shown in Figure 8 below, when guiding a group of friends through the Okinawa Islands in Japan, I used this method to map out “Camping Grounds in Okinawa, Japan”, pinning coordinates with each campsite neatly listed in the left-hand layer pane.
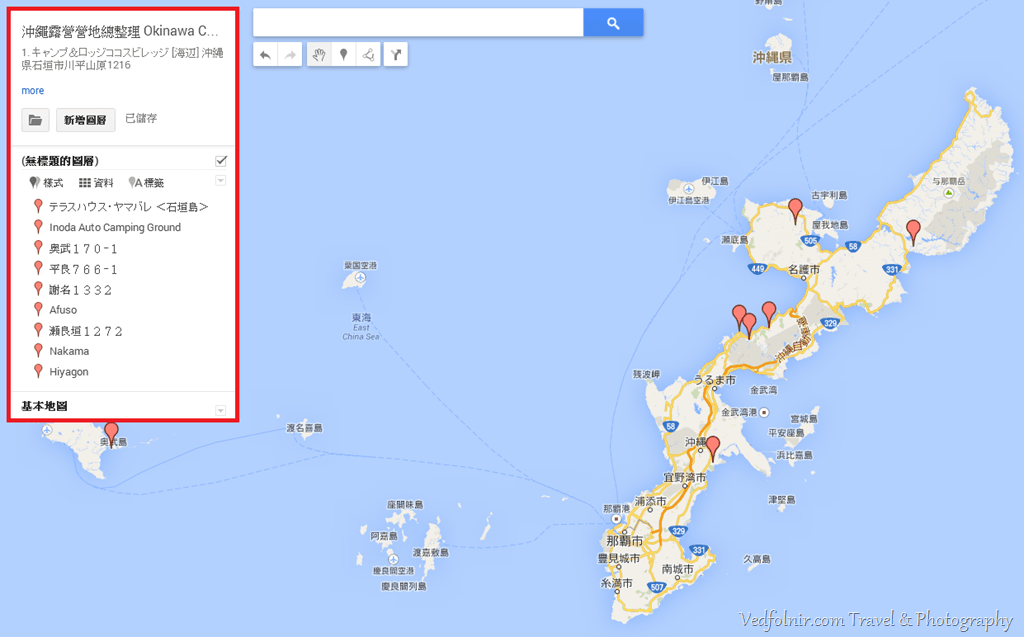 Figure 8: Complete custom map example
Mizuc Tip: To make sharing seamless, remember to rename your map and write a clear description. Click “Untitled map” at the top of the layer panel to open the “Edit map title and description” dialog. In Figure 8, I titled the map “Complete Guide to Okinawa Campsites”.
Section 3: Customizing Marker Symbols and Colors
To categorize locations visually—such as landmarks, restaurants, or lodging—Google My Maps lets you change marker colors and icons.
In Figure 9, clicking the “paint bucket icon” (Callout 2) next to any location (Callout 1) opens the styling panel.
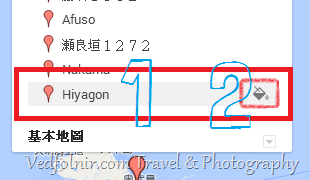 Figure 9: Editing point styling (1)
Next, as shown in Figure 10, clicking the paint bucket opens the “Style panel (Callout 1)” and “Info card (Callout 2)”.
The styling panel (Callout 1) contains two settings:
- Color and Icon Shape: Combine different colors and shapes to categorize markers;
- More Icons: Google organizes preset icons under categories including Business, Crisis, Facilities & Services, Entertainment, Transportation, and Weather. These are detailed further in Section 4 below.
The info card (Callout 2) provides options to Delete (trash can icon), get Directions, and Edit (modify title and notes).
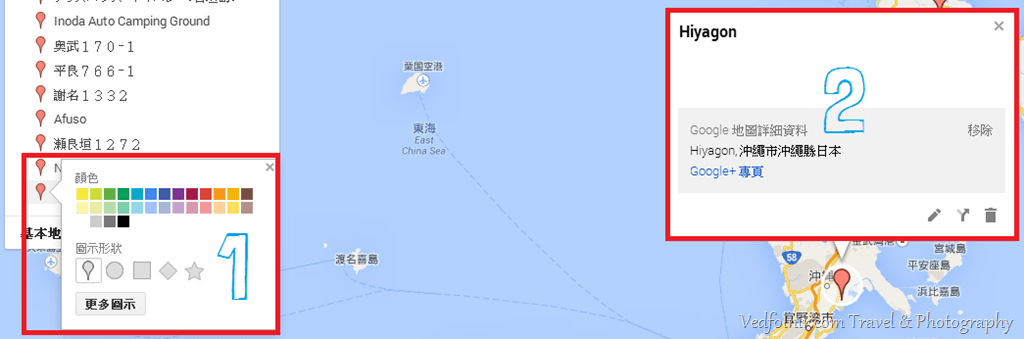 Figure 10: Editing point styling (2)
Section 4: Overview of Coordinate Icons
Business Icons:
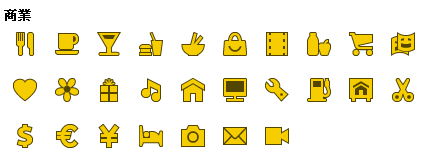 Figure 11: Business icons
Crisis & Warning Icons:
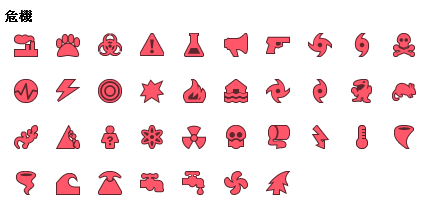 Figure 12: Crisis icons
Facilities & Services Icons:
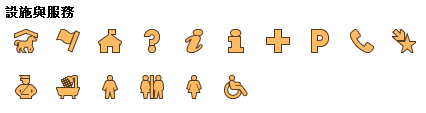 Figure 13: Facilities & services icons
Recreation & Entertainment Icons:
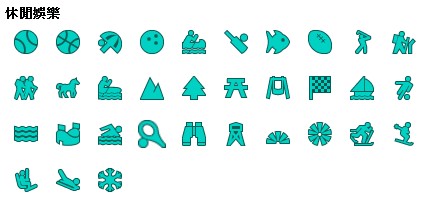 Figure 14: Recreation & entertainment icons
Transportation Icons:
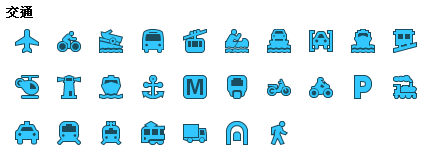 Figure 15: Transportation icons
Weather & Climate Icons:
 Figure 16: Weather icons
Mizuc Reminder: Learning to use these symbols effectively to make maps intuitive and readable is an art well worth mastering.
Section 5: Completed Custom Map Example
After placing all markers and configuring details, a completed map looks like Figure 17 below.
Viewers can readily identify relative locations, routes, and site classifications, providing an exceptional visual aid for pre-trip briefings.
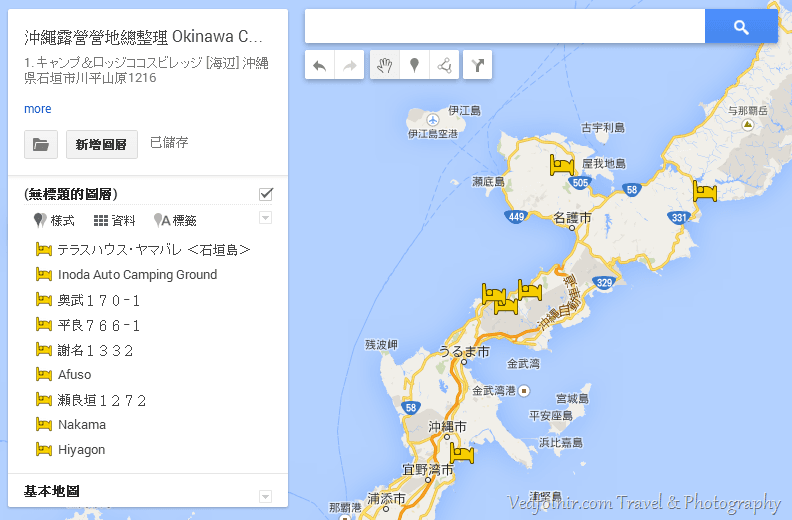 Figure 17: Fully assembled Google Maps custom itinerary
Section 6: Using Directions in Google My Maps
In Figures 18 and 18-1, clicking the “Add directions” button (Callout 1 in Figure 18) generates an empty directions layer (Callout 3) in the left panel.
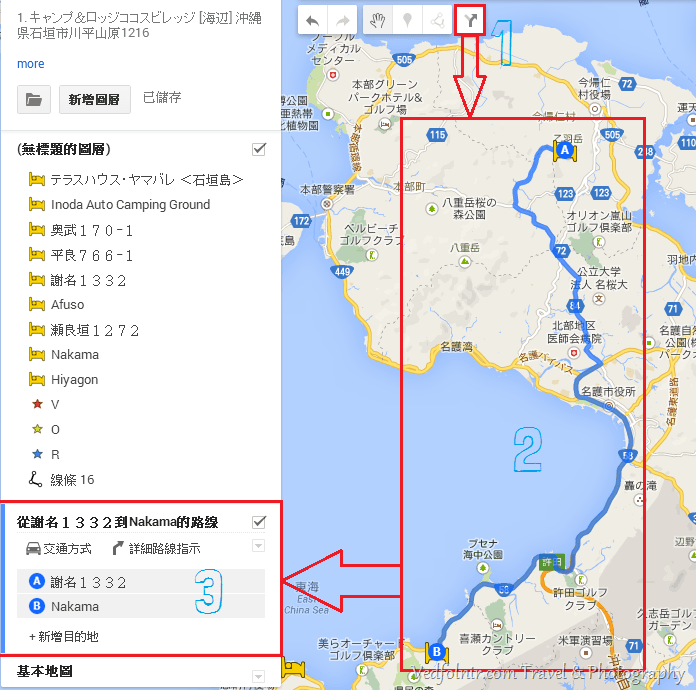 Figure 18: Directions workflow
There are two ways to plot a route. First, click existing markers directly on the map (Callout 2) or select them from existing layers; the system automatically populates “Origin A” and “Destination B” and draws the navigation route (dark blue line) on the map.
Alternatively, as shown in Figure 18-1, enter saved place names or type new addresses directly into the blank A and B input fields; the map engine will look them up automatically.
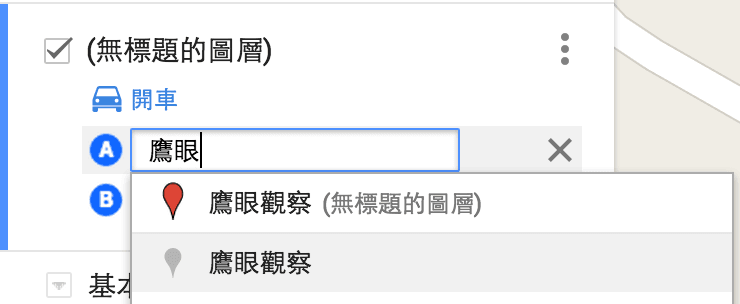 Figure 18-1: Directions layer
The directions layer includes “Transportation Mode” and “Step-by-step Directions” (accessible via the three-dot menu on the layer card). Modes include Driving, Bicycling, and Walking.
Step-by-step directions list estimated travel duration, distances, and detailed driving instructions along the recommended path.
Section 7: Choosing Base Map Styles
As shown in Figure 19, at the bottom of the layer management panel is a “Base map” selector offering nine different cartographic styles.
Mizuc Tip: The styles I use most frequently are “Default” and “Satellite”.
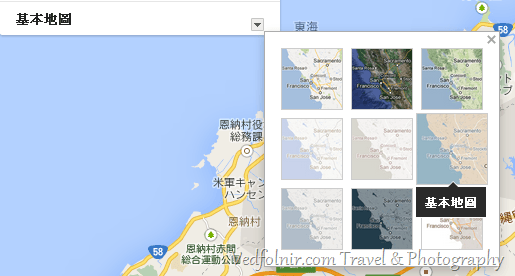 Figure 19: Nine base map styles
When set to satellite view, the custom map renders as shown in Figure 20.
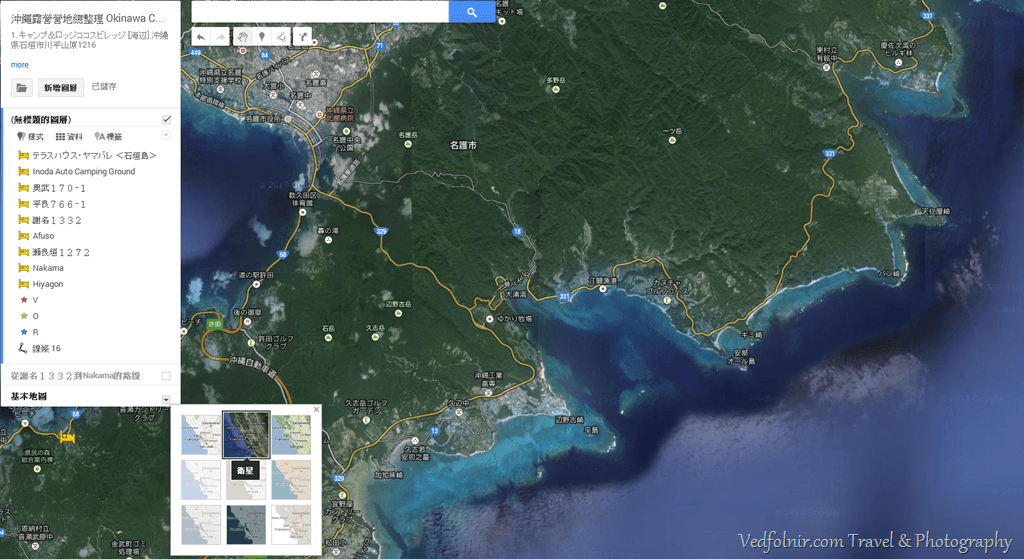 Figure 20: Map rendered with satellite base layer
Section 8: Restrictions & Guidelines
Although My Maps no longer separates personal and business tiers, Google still enforces several technical limits to keep in mind:
- Map layers: Up to 10 layers per map.
- Map features (points, lines, shapes): Up to 10,000 items total per map (maximum 2,000 per layer).
- Custom attributes per feature: Up to 50 columns in the data table.
- Supported import formats: CSV, TSV, KML, KMZ, XLSX, or Google Sheets.
- Import file size limits: Up to 5 MB for uncompressed KML/KMZ files (max 2,000 rows per layer); up to 40 MB for other formats.
- Map printing: Supports high-resolution exports up to 4x screen resolution.
Section 9: Takeaways on Google My Maps
Google phased out Maps Engine in January 2016 and transitioned features into the consumer-facing “My Maps”.
Custom mapping has proved an indispensable travel companion for Mizuc, serving both route design and pre-trip presentations with clear visualization.
A few shortcomings remain: directions layers are capped at 10, total points are limited, and advanced tagging filters are lacking. Furthermore, the beloved dedicated magnifying glass tool from legacy versions is gone.
Even so, My Maps remains one of the finest mapping tools available today—especially for a free product.
Zooming in and out smoothly via mouse scroll wheel provides a workable alternative, even if it lacks the targeted precision of the old magnifier tool.
Reader Q&A
1. Why can’t I select “Public Transit” when planning routes? (Reader Patia)
Reader Patia asked:
Transit mode cannot be selected for routes, any workaround?
Mizuc replies:
This is an intentional architectural constraint of Google My Maps. Google designed My Maps primarily for custom points of interest, self-driving trips, and hiking trails, supporting only Driving, Bicycling, and Walking modes without live public transit schedule integration.
Practical Workaround:
- Look up bus, metro, and train schedules and transfers using standard Google Maps first.
- In My Maps, add transit stations and bus stops as custom marker points, noting departure times and train numbers in the description field.
- Connect stations to destinations using walking route layers to create an exceptionally clear transit itinerary.
2. How can I create multi-day travel routes (e.g., 3 days and 2 nights)? (Reader tina)
Reader tina asked:
How can I create a travel trail for a 3-day itinerary?
Mizuc replies:
Making good use of the “Layers” feature is the ideal solution!
- In the left layer panel, create separate layers titled “Day 1 Itinerary”, “Day 2 Itinerary”, and “Day 3 Itinerary”.
- In each layer, click “Add directions”, setting the starting point and ending point for that day.
- Manually add intermediate stops by clicking “Add stop” or dragging the route on the map.
- When viewing on mobile or desktop, check or uncheck individual layers to toggle single-day views or see the complete three-day trail.
3. Why do street and city names switch to English when printing? (Reader Ah-su)
Reader Ah-su asked:
When printing an A3 landscape map as a PDF or image, the previewed map changes all street names into English. Do you know how to resolve this?
Mizuc replies:
Thanks for reporting! This occurs because the backend server rendering high-res print files misinterprets regional locale headers.
Quick Workaround:
Avoid using the built-in “Print map” menu option in the left panel. Instead, click “Preview” at the top right to open full-screen view mode, then trigger your browser’s print dialog (Ctrl + P on Windows, Cmd + P on Mac). Set the print destination to “Save as PDF” or choose A3 Landscape. Because the browser renders the page locally, all local language labels and street names are 100% preserved!
4. Why can’t I click links or copy text in descriptions on mobile apps? (Reader chen Jessica)
Reader chen Jessica asked:
Thanks for sharing these setup tips! When editing on desktop, the description box displays nicely, but in the Google Maps app on iPhone and iPad, links aren’t clickable and text can’t be copied. How can I overcome this?
Mizuc replies:
This is a known limitation of the mobile Google Maps app regarding custom map layers; the app only reliably renders marker titles, disabling interactive touch events for rich text and links.
Mobile Workaround:
Avoid opening the shared link inside the Google Maps app on iPhone or iPad. Instead, open the map URL directly in Safari or Chrome, and toggle “Request Desktop Site”. The mobile browser will load the full desktop web view, making all hyperlinks clickable and notes copyable!
References
- Japan Travel: Search and reserve accommodations through Japanese hotel booking engines for boutique ryokans and private lodging gems.
- Overseas Travel: We recommend searching accommodations through platforms like Agoda.
- Self-Drive Travel: Compare global car rental rates across worldwide providers!
- Official Site: “Google My Maps”
Editorial Changelog
- Original published April 15, 2014;
- First revision June 29, 2015;
- Second revision July 27, 2015;
- Third revision July 28, 2016;
- Fourth revision February 16, 2018.
Archived Snippets from Original Draft
Archived on June 29, 2015:
Beyond offering enterprises custom mapping tools, Google also provided conditioned free access for everyday enthusiasts…
Support Independent Perspectives & In-Depth Insights
Every thoughtful analysis and candid critique comes from our dedication to truth and quality. We choose not to follow sensational algorithms or clickbait headlines.
Sustaining independent research requires reader support. Make a one-time or monthly contribution, securely processed by Google.
Payments secured by Google · Manage or cancel anytime in your Google Account

Comments