
At the end of December I suddenly had to make a trip to mainland China to handle some matters, and next year I plan to travel to Japan a few times. Last night while booking flights, I discovered my passport had actually expired (how time flies).
Besides bringing your national ID and paying the official fee, the most important thing for a new passport is to prepare 2 ID photos taken within the last six months (also called headshots or portrait photos).
A Day Trip to the Bureau of Consular Affairs
Early in the morning I arrived at the Bureau of Consular Affairs, Ministry of Foreign Affairs of the Republic of China (Taiwan) on Jinan Road, and saw a cute blonde mixed-race toddler brought by his grandmother, only about one or two years old, darting freely through the corridor while waiting for his number. He was absolutely adorable.
The problem is I had not specially taken an ID photo in ages, let alone one that, per official rules, must be a new photo within six months. So how to take my own portrait photo became the most troublesome task of this trip.
Next I will use the strictest ID photo shooting and retouching dimensions as an example, teaching you how to print and output headshots (portrait photos) that meet the ID and passport photo specifications in the shortest time and at the lowest cost, and introduce in detail the three options for taking photos.
A little shortcut trick: if your adult appearance has not changed much, just be careful not to use a photo identical to your national ID or driver’s license photo — sometimes even an old photo can slip through (at your own risk).
Following the news: an expired passport can only be reissued, and I would not dare imitate the grandson of some dignitary who only rushed to get a replacement at the airport. So in the morning I obediently went to the Bureau of Consular Affairs to apply for a new passport. You might also wonder: how could a certain child produce two headshots on the spot at the airport? Forgetting the passport was expired, but not forgetting to bring photos (confused face).
Shooting indoors reduces the influence of light sources; remember to dress formally (wink).
Three Options for Taking ID Photos
1. Traditional Photo Studio
Ranked first is still the traditional photo studio as the simplest and prettiest (not blocking the business of Zhen Yatou’s dad).
Just spend three or four hundred dollars to have the shop’s professional photographer shoot, and you get 6-8 headshots and a negative (nowadays most provide a small CD containing the original photo files), with proper image retouching, so the image quality is naturally the best.
If you want to order reprints later, six headshots count as one set, and the shop will cut them for you; the price for one set generally falls between 80 and 150 dollars (depending on the shop’s conscience).
But saving money is the survival way of a modern good citizen, so the above option has long been ignored by me (laughs).
In fact, apart from one professional headshot taken years ago at Zhen Yatou’s dad’s Tamsui photo studio, I have not gone to a studio specifically for photos in over ten years.
2. The ID Headshot Machine on the First Floor of the Bureau of Consular Affairs
For just 120-150 dollars, you can take photos directly at the ID headshot machine (instant photo booth) on the first floor of the Bureau of Consular Affairs, which is much more convenient for those who forgot to bring photos or are too lazy to make a special trip to a studio.
However, although the image quality and size of the ID machine meet passport specifications, and volunteers are on hand to guide you, the resulting “headshot” is not necessarily pleasing. After all, it is the result of flat lighting plus rigid computer instructions plus a limited number of shots. Unless it is for an unimportant application form or document, I would not particularly recommend using the ID machine (of course, if you do not care about image quality, it does not matter).
3. DIY ID Photos (Headshots) Taken at Home!
The article mentioned earlier that “reasonable” photo retouching is necessary, especially since the international community has developed a set of universal passport photo specifications. As long as you want to take a passport ID headshot, you need to follow these photo specifications. So below I will introduce how to take internationally acceptable DIY ID photos (headshots) at home.
Headshot Shooting Specifications for Passport ID Photos
Formal portrait photos for passports are specified in detail by the International Civil Aviation Organization (ICAO), including the following specifications:
- 2-inch photo, 4.5 cm tall, 3.5 cm wide (excluding border/bleed);
- The distance from the top of the head (including the top of the hair) to the tip of the chin must be between 3.2 cm and 3.6 cm; (the clerk will measure precisely with a steel ruler)
- The top of the hair must not touch the edge of the photo;
- Natural expression, a slight smile is allowed, but it must be symmetrical and the teeth must not show;
- The face must remain centered facing the camera, the contours of both ears must appear, and the focus must be clear;
- Skin tone, color tone, color temperature, white balance, brightness, and contrast must be adjusted to natural colors and must not deviate excessively;
- Facial lighting must be even, with no obvious shadows;
- The photo background must be white; if you cannot find one, you can edit it out afterward;
- Clothing colors must not contain large areas of white;
- Permanent facial features must be retained and not edited out, such as distinctive moles, birthmarks, and scars, but appropriate pimples and small scars are still allowed to be retouched.
Actually, taking a headshot that meets natural expression and normal specifications is simple.
When taking photos at home, you do not need to fill the entire camera viewfinder with the portrait like an outside studio (full frame). We only need to shoot a normal-sized photo with a digital camera at a distance of one or two meters (of course, the subject still needs to dress neatly and sit upright), and then precisely crop out the size required for a 2-inch photo!
In short, when taking ID photos at home, there are only three key points to note:
- Whether the focus is clear;
- Whether the light source is bright and even (fluorescent lights have flicker issues; window daylight is best); and
- Whether the expression and body posture are proper (this is very difficult for children).
Of course, it is best if a friend can help take the photo. For me, just placing the focus point on the eyes when shooting myself took quite some effort (tears).
How to Cheaply Output (Print) ID Photos Yourself
If you already have a photo printer, such as the “Canon PIXMA TS8070 photo all-in-one,” you can print directly at home.
There are now many mini photo printers, such as “Hiti Pringo Prinhome” or “Polaroid ZIP,” but these printers have poorer photo output quality and are not suitable for printing formal ID headshots.
If you do not have suitable equipment, you can try the “InPhoto instant photo printing” service offered by FamilyMart convenience stores; relevant stores can be found in the “FamilyMart Photo Instant Photo Printing Store Information” below.
**
Industry insider news: although you can arrange a collection of headshots yourself and take it to a photo studio to output on ordinary 4×6 photo paper for only about 4 dollars per sheet, most traditional photo studios will refuse this request because their profit is too low, earning only the meager cost price of the photo paper. This is a key point discussed privately in meetings by studios in various regions, and could be considered a kind of alternative business alliance.
InPhoto charges 6 dollars to print one 4X6 photo**, which, although more expensive per sheet than traditional studios and even higher than the per-sheet cost of some home photo printers, InPhoto will not forbid you from printing headshots and requires no additional hardware. More importantly, InPhoto provides fast, convenient, and affordable service, making it well worth recommending.
In addition, besides printing a single 4×6 photo for 6 dollars, InPhoto also offers a 60-dollar ID photo output service. If you are too lazy to plan the headshot layout on a computer at home, you can take a single photo or a digital file of an already-cropped headshot directly to InPhoto to use the ID output service; the machine itself provides online editing and layout functions.
Although InPhoto has basic image editing and cropping functions, passport headshots have a strict 3.2-3.6 cm limit, so I suggest you edit and crop at home first to confirm it is correct, to avoid making an extra trip.
ID Photo Image Editing Instructions
After a photo is taken, to edit and crop a normal headshot, you can follow along with me like this (suddenly feeling a rhythm coming on).
- First, in image software that provides layers (e.g., Photoshop), draw a rectangle frame of “4.5 tall (times X) and 3.5 wide (times X)” (hereafter the portrait frame). The purpose is to pull out an indicator frame for the headshot edge in a general portrait photo; when outputting the photo later, the portrait frame will be the actual ID photo size.
- Then draw two rectangle frames of “long side 3.2 (times X)” and “long side 3.6 (times X)” (hereafter the limit frames), with arbitrary widths. These two limit frames are used to measure (compare) the suitable ratio between the top of the hair and the chin of the face. In other words, as long as the top edge of the head aligns with the top edge of the limit frame and the chin edge is placed between the difference of the two limit frames, you can find the most suitable image ratio.
- Next, (drag) change the size of the photo itself, or drag the three self-made frames to enlarge or shrink them, so as to control the upper and lower edges of the portrait’s head between the two limit frames. In this way, when outputting the photo, you can naturally control the head to the correct ratio (the key is that the top of the head to the chin needs to be controlled between 3.2 and 3.6 cm).
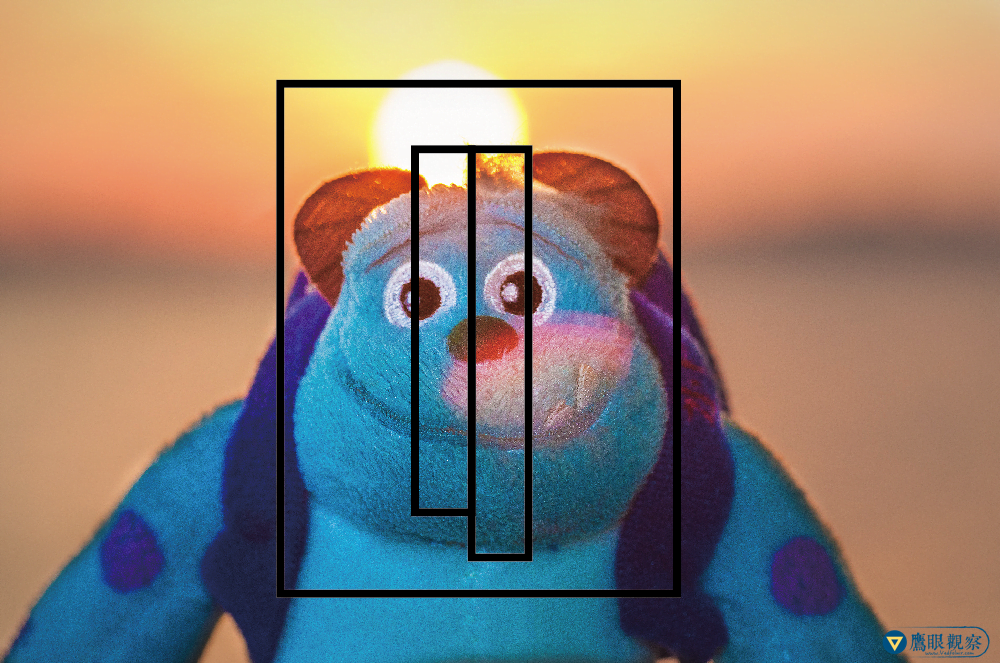
A simple trick for cropping a frame that fits the headshot size.
Of course, if you are quite familiar with the image software workflow, you can also directly call up the ruler to measure each dimension. But I think most people reading this are not very familiar with image layout design, so this method lets everyone easily get the correct size.
Also, I think that rather than directly using the correct “centimeter, millimeter” units for the portrait frame size in image software, it is better to first draw the portrait frame using the resolution of the original photo, which is why I repeatedly used the “times X” setting earlier.
First get the portrait frame size, then use the X multiplier to adjust the correct size of the two limit frames, and then output using a “very large” headshot (meaning the bigger the photo, the more you enlarge the portrait frame accordingly), so that the photo’s image quality at output will be the most refined.
Similarly, if you want to arrange six headshots first, we can first draw a rectangle frame of “10 tall times X and 15 wide times X.” Then place the headshots cropped above into it in order (as shown below).
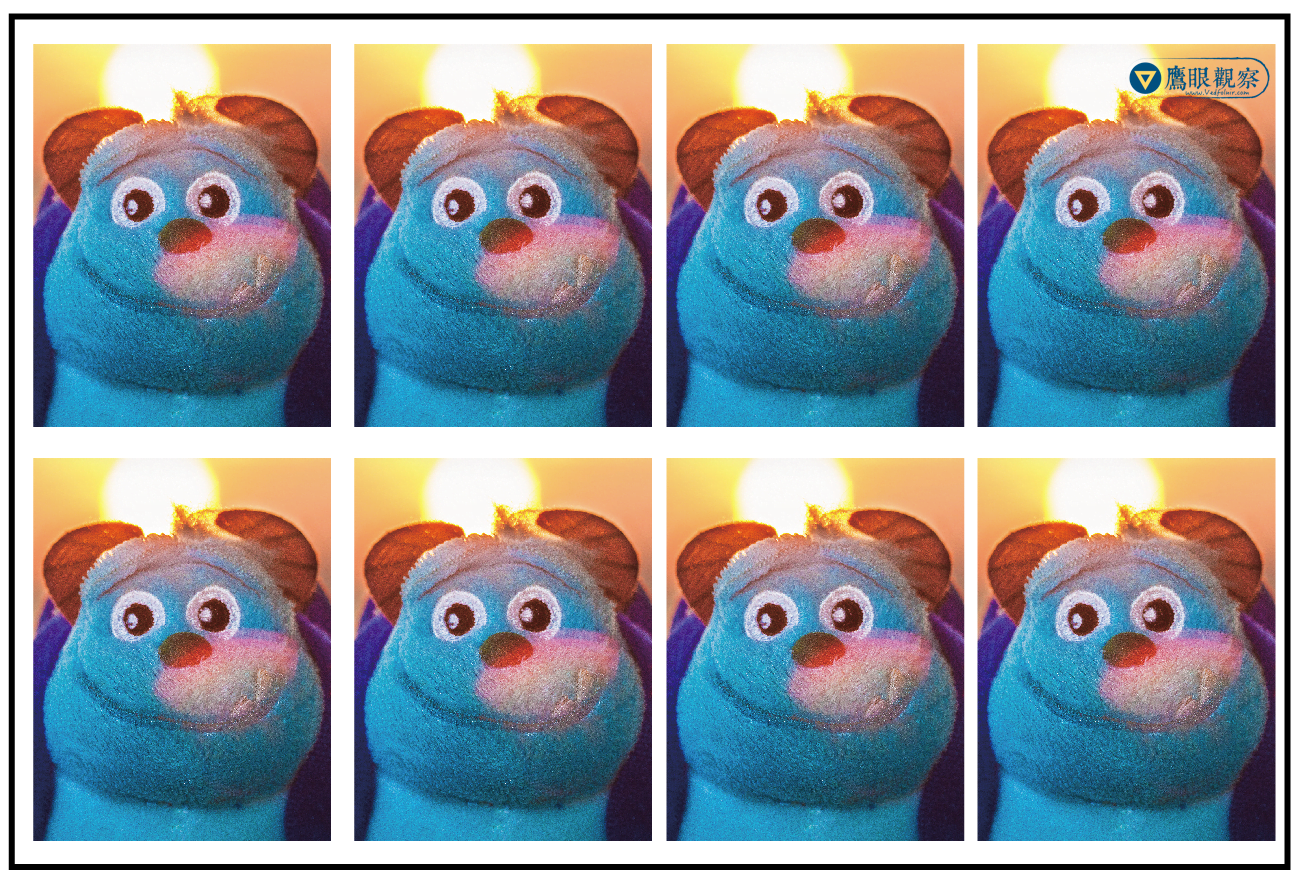
A 4X6 glossy photo paper can hold 8 2-inch headshots.
Also, for a 1-inch headshot, the standard specification is 2.5 cm on the wide side and 3.5 cm on the long side. We must then use 2.5 and 3.5 times X to get the corresponding rectangular indicator frame for the headshot photo.
References
- For Japan travel, I recommend searching for Japanese guesthouses, hotels, inns, and hotel accommodation deals at ”🇯🇵 Japan Hotel Deals Search and Booking.” This is a website under JTB, Japan’s largest travel group, with many off-the-beaten-path tours and hotel accommodations to choose from.
- For overseas travel accommodation, we recommend searching for hotel and guesthouse deals on the “Agoda” website.
- If you love renting a car and driving yourself, you can search for car rental deals worldwide at ”🚗 Self-Drive Car Rental Search and Booking”!
- First edition published November 27, 2013; second edition October 29, 2017.
FamilyMart Photo Instant Printing Store Information
The table on the next page lists the store names and addresses of FamilyMart locations equipped with “Photo Instant” machines; feel free to make use of them.
Source: FamilyMart official website, retrieved on 2013.11.26 (store operations may change, please refer to the official website announcement).
Support Independent Perspectives & In-Depth Insights
Every thoughtful analysis and candid critique comes from our dedication to truth and quality. We choose not to follow sensational algorithms or clickbait headlines.
Sustaining independent research requires reader support. Make a one-time or monthly contribution, securely processed by Google.
Payments secured by Google · Manage or cancel anytime in your Google Account


Comments