

Browsing our site over the past few days, you may have noticed gentle white snowflakes drifting across your screen. Rest assured, this isn’t display noise from a bad cable, but a neat holiday easter egg from the Jetpack team. Beyond adding charm to the page, the steadily fluttering snow creates a wonderfully festive winter atmosphere.
What makes it especially engaging is that your cursor movements dynamically stir and guide the drifting snow. It’s a delightful touch worth installing for site owners and bloggers alike—especially with Christmas in the Northern Hemisphere just days away, when falling snow perfectly complements the seasonal chill.
As shown in Figure 1 below, this falling snow visual effect covers the entire browser viewport without interfering with normal clicking or mouse navigation. The snowflakes swirl and drift in response to cursor movement.
 Figure 1: Site screenshot.
When you first open the webpage, the snow doesn’t start falling immediately; the animation activates as soon as the visitor moves the cursor. (Self-deprecating note: Even though I captured Figure 1 to illustrate the snow effect, you should already be watching the live snow animation right now while reading this article—making me feel a little silly!)
How to Enable the Snow Falling Effect
Method 1: Universal JavaScript (Works on any website, including Google Blogger / Blogspot)
<script src="./snowstorm.js" type="text/javascript"></script>Once added, the browser loads the effect script upon opening the page and immediately runs the falling snow animation. Alternatively, you can place this script tag right before the closing </body> tag to defer execution, minimizing any impact on initial page load speeds. While the script is already exceptionally lightweight, every millisecond counts when it comes to optimization!
Method 2: WordPress Jetpack Setting (Limited time until January 4th)
The original source of this holiday animation was provided as a seasonal feature by the WordPress Jetpack plugin. After updating Jetpack to the latest version, navigate in your WordPress admin dashboard to “Settings” → “General”, where you will find the toggle shown in Figure 2: “Snow - Show falling snow on my blog until January 4th.” Simply check the box to enable the snowfall effect.
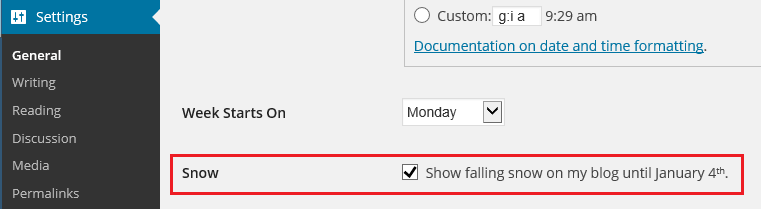 Figure 2: Admin settings panel for falling snow.
Please note that because Method 2 has a strict time window (until January 4, 2015), if you enjoy this snowfall feature as much as I do, make sure to use Method 1 so your site can enjoy fluttering snow all winter long!
Further Reading
- Comprehensive WordPress Installation Guide, Experience, and Troubleshooting Log.
- WordPress: How to Delete Unused Themes (Admin Dashboard and Server File Management).
Support Independent Perspectives & In-Depth Insights
Every thoughtful analysis and candid critique comes from our dedication to truth and quality. We choose not to follow sensational algorithms or clickbait headlines.
Sustaining independent research requires reader support. Make a one-time or monthly contribution, securely processed by Google.
Payments secured by Google · Manage or cancel anytime in your Google Account


Comments